Good Night, Leslie Nielsen. RIP.
 Leslie Nielsen, when he first (re-)appeared on the movie screen in the comedy classic "Airplane". Leslie Nielsen, when he first (re-)appeared on the movie screen in the comedy classic "Airplane".
|
 Again, from the movie that helped to push him back into the big time, "Airplane". The other actor is (of course) Again, from the movie that helped to push him back into the big time, "Airplane". The other actor is (of course) Jim PhelpsPeter Graves.
|
 Just don't call him "Shirley". Just don't call him "Shirley".
|
 And from the other comedy classic, "The Naked Gun". And from the other comedy classic, "The Naked Gun".
|
Gary Schafer, 28 November 2010
My good friend just dropped a Skype chat message on me. "Did you hear the news?" No, I answered. What's up?
His response: "Leslie Nielsen. RIP."
My response to that was as simple as it was explicit: "SHIT!"
Sorry. I've tried to keep this a family-friendly site. I don't discuss politics or religion or my opinions on the various subjects du jour. But this? I grew up on Nielsen. It started with "Airplane!", then went to "The Naked Gun", then back in time to the future with 1956's "Forbidden Planet". You may not recognize that movie. But take a look at the movie poster and most likely you'll recognize one of the icons of technology of that day.
The National Post has the headline of "Comedian Leslie Nielsen dead at 84". Except he wasn't really a comedian. He was an actor who just happened to do comedy really, really well. By my count on the Internet Movie Database (IMDB), Nielsen lists 247 movies and television shows to his credit over his lifetime.
Go find someone who has that long of a record, spanning (pause while I do the math) 60 years. And also look for as varied an acting resume as he has. Good luck.
But since we as Americans tend to have myopia and short-attention spans, yes, it was the many comedies he did in the last years of his career that we remembered. But, damn, he was good at it. When 9/11 occurred, many an American took solace by watching comedies. I swore I was going to wear out my various "Airplane" and "Naked Gun" DVDs.
So, thanks, Leslie. RIP, my friend.
What Just Happened (Part Deux)...?
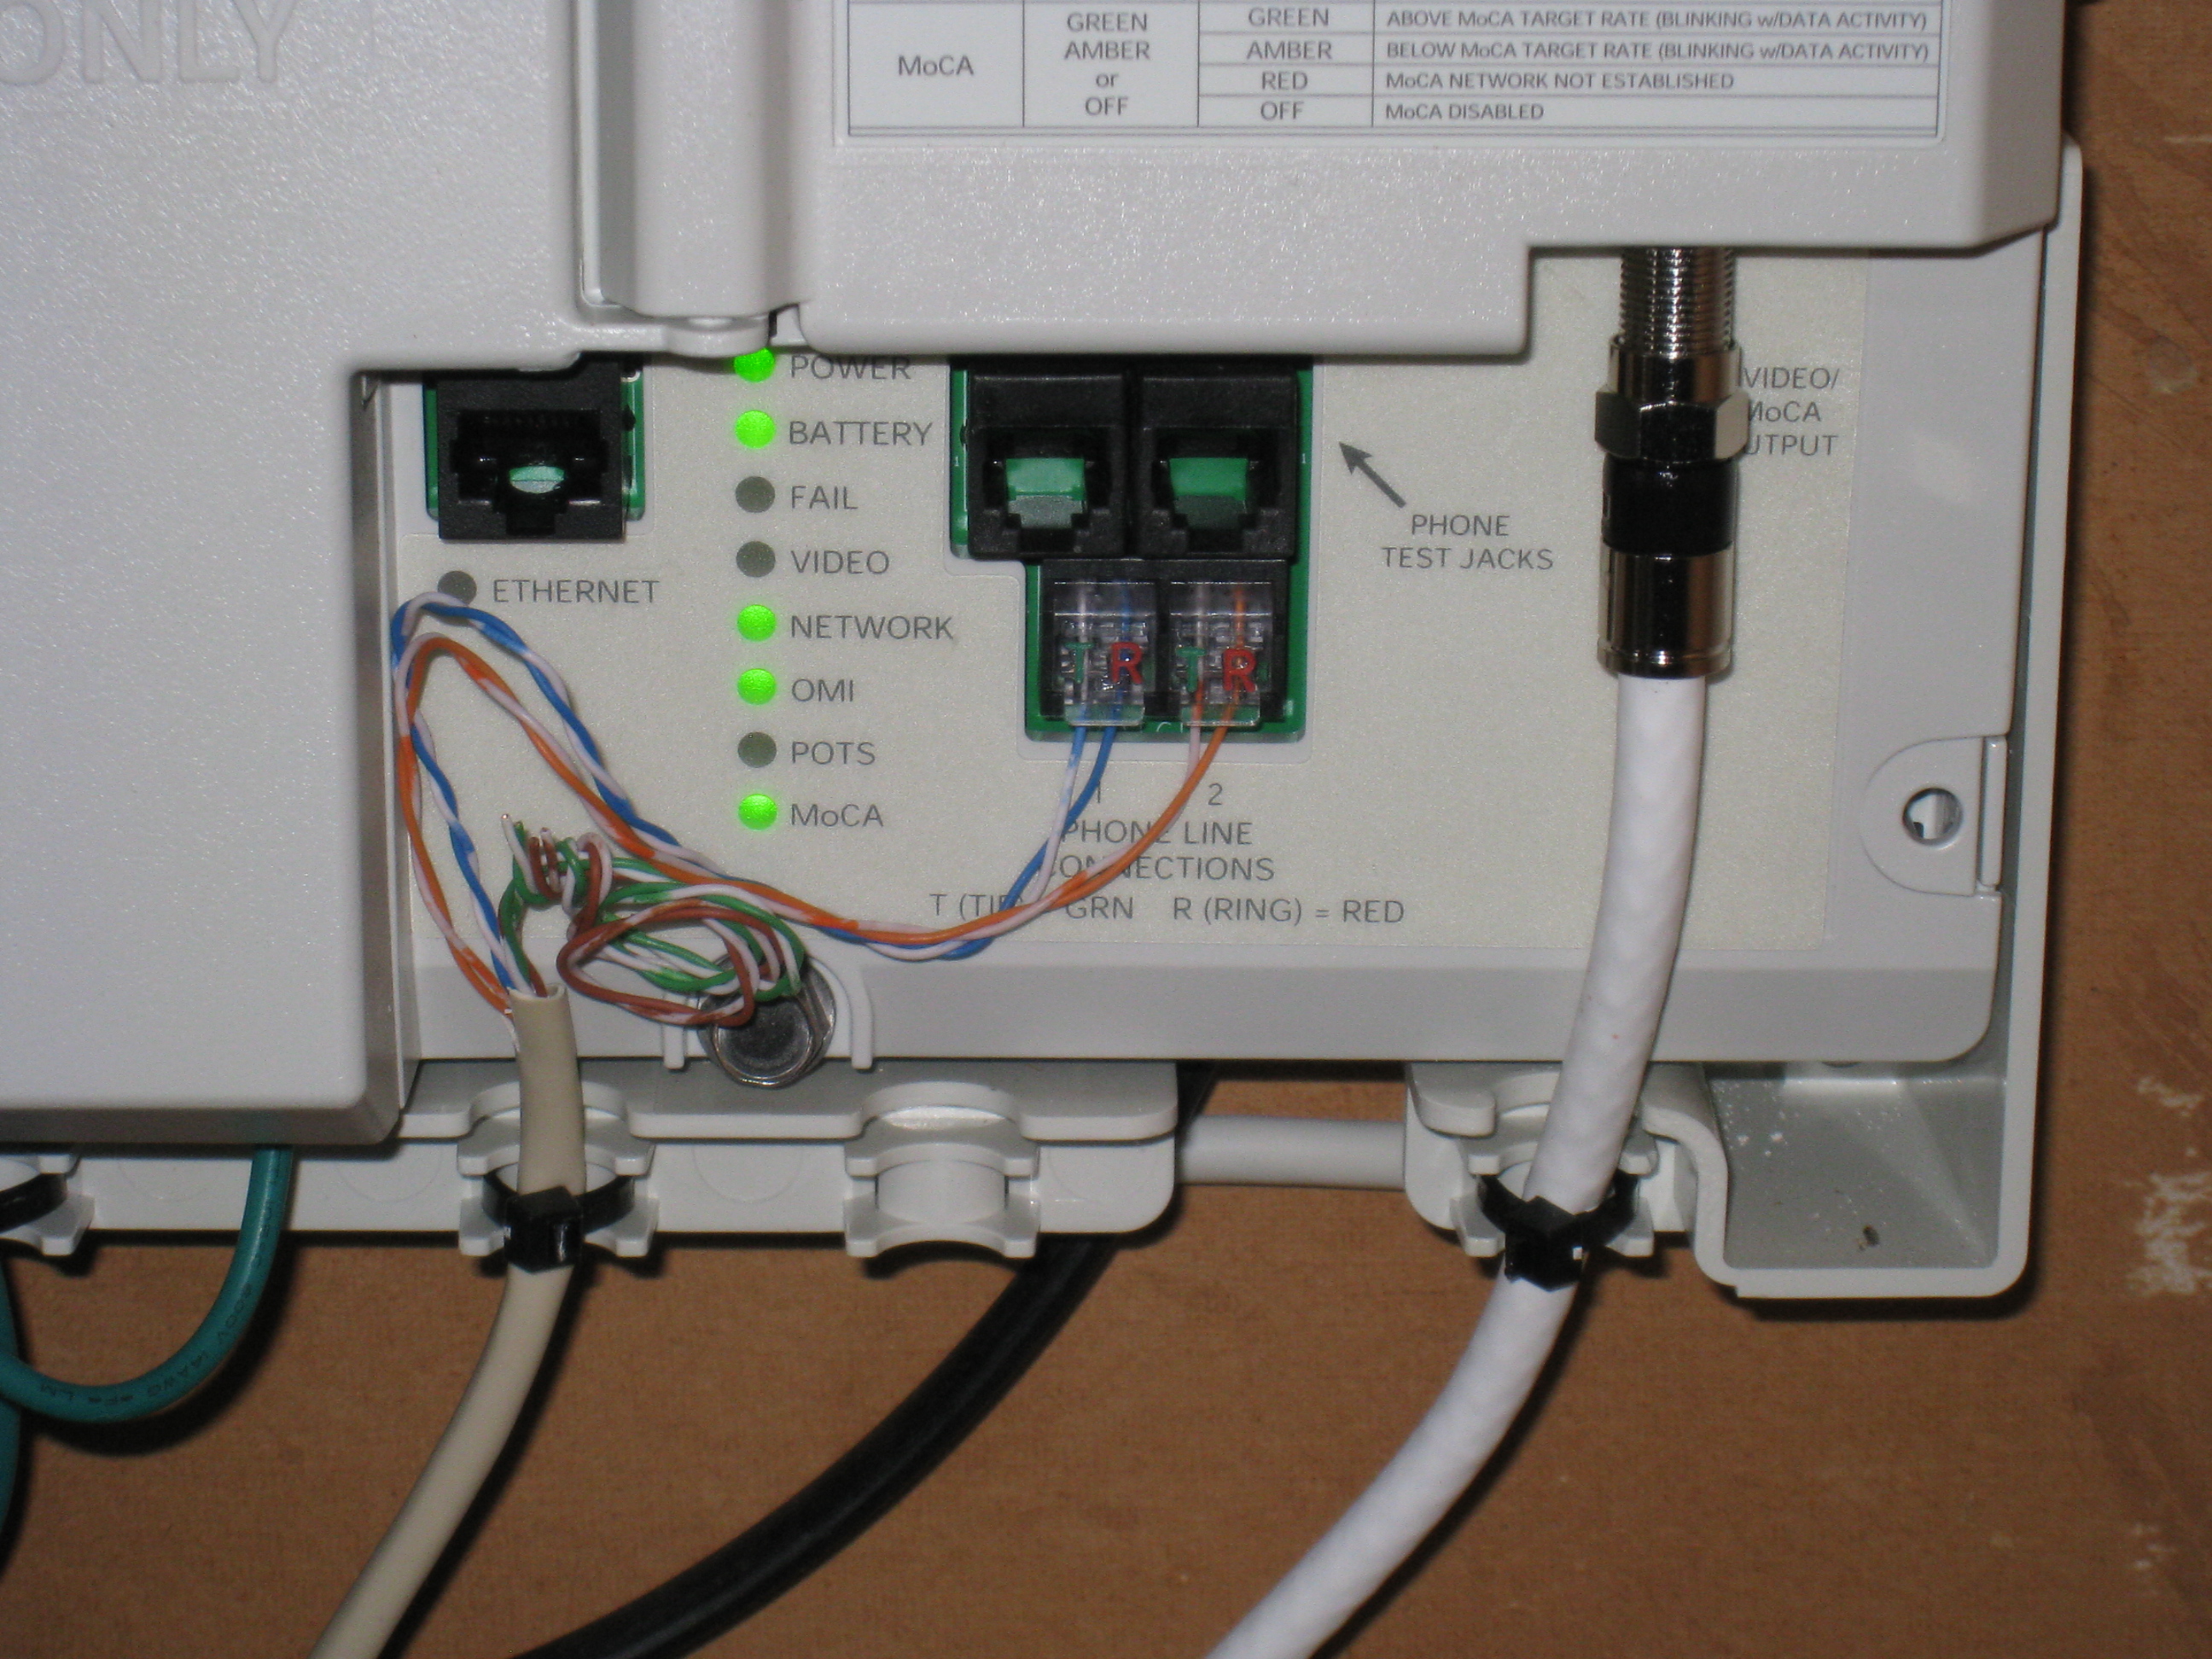
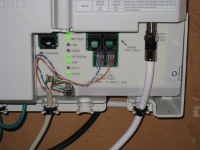 Figure 1. These are the various status lights on our MOCA (Multimedia Over Coax Alliance) box. This is the box that converts our fiber (optical) signal into the various electrical signals for our telephone, TV, and Interwebz. When the problem occurred, the "FAIL" light was blinking red and the "VIDEO" light was a solid red. Figure 1. These are the various status lights on our MOCA (Multimedia Over Coax Alliance) box. This is the box that converts our fiber (optical) signal into the various electrical signals for our telephone, TV, and Interwebz. When the problem occurred, the "FAIL" light was blinking red and the "VIDEO" light was a solid red.
|
Gary Schafer, 28 November 2010
Yes, it happened again. As if having it happen once before wasn't enough, no, it happened again. This web site was down. However, I'm not taking the blame this time. This time, the blame falls fully and squarely on my service provider, Verizon. Sometime on Wednesday afternoon (the day before Thanksgiving), we lost our fiber connection to the outside world. Unfortunately, I didn't realize the full extent of the problem until Friday afternoon. I found the MOCA box (MOCA = Multimedia Over Coax Alliance, and "the box" refers to the big box hanging on the wall of our garage) had a blinking, red "FAIL" status light, and the light marked "VIDEO" underneath was a solid red. (See Figure 1.) When I called Verizon's tech support, they had me reset the box, which did no good. They then set me up for an appointment with one of their technicians I was told for Saturday, sometime between 8 am and 8 pm.
Quick digression. Ya know, I'd love to have a company that was so powerful that you can tell your customers, "We'll be there sometime within a 12 hour window. Suck it up."
The technician didn't show up on Saturday. I had called at 4 pm to try to get an update on when we could expect the technician. I was told he'd be there "by 6". Suffice to say he didn't show up then, either. At 8 pm, the end time of when we were to expect the tech, I let my wife call Verizon back. Let's just say that she has a, um, forceful way of dealing with people in these situations. Let's also say that "reamed a new one" was put into affect here. We were told that the tech would be here first thing Sunday morning.
The tech showed up half an hour ago. It's now 11:15. Do the math. When he finally pulled up, he hopped out and asked, "Is everything working?" I walked over to the MOCA box and, sure enough, the red lights were gone and I now had all greens. I told him to hang on a minute. I ran into the house, checked the TV, phone and Internet. All working. We were back in business.
Next question. What happened? He hadn't done anything at our house. When I asked, he said that our connection at the "big box" nearby, the one that serves as the concentration point for all of the FiOS homes in our area, was broken. He'd gone straight to that box first and, while troubleshooting, had found the problem. It was a simple fix, he said. Apparently (to him), the problem was that, when another tech was doing some work in the box, that tech had disconnected us. Turns out that's what a blinking red "FAIL" light means. It means the box is not receiving the light signal. C'est la vie.
Except that caused two problems. The first (and obvious) one was that it disconnected us completely. I had no access to my computer while I was away from the house, we had no way to get information off of the Internet (important for my research project) and my wife couldn't work from home. It also meant that there were no images for several of the wiki pages on the Freemat wiki site. Many of those images are served directly from here. The second problem was that, since we were disconnected for four days(!!!), we were given a new IP address when we came back up. This meant that I had to ensure that our new IP address was propagated to dyndns.org. That would ensure people could find this website.
We're back in business. Time to get back to work.
Mapping My House
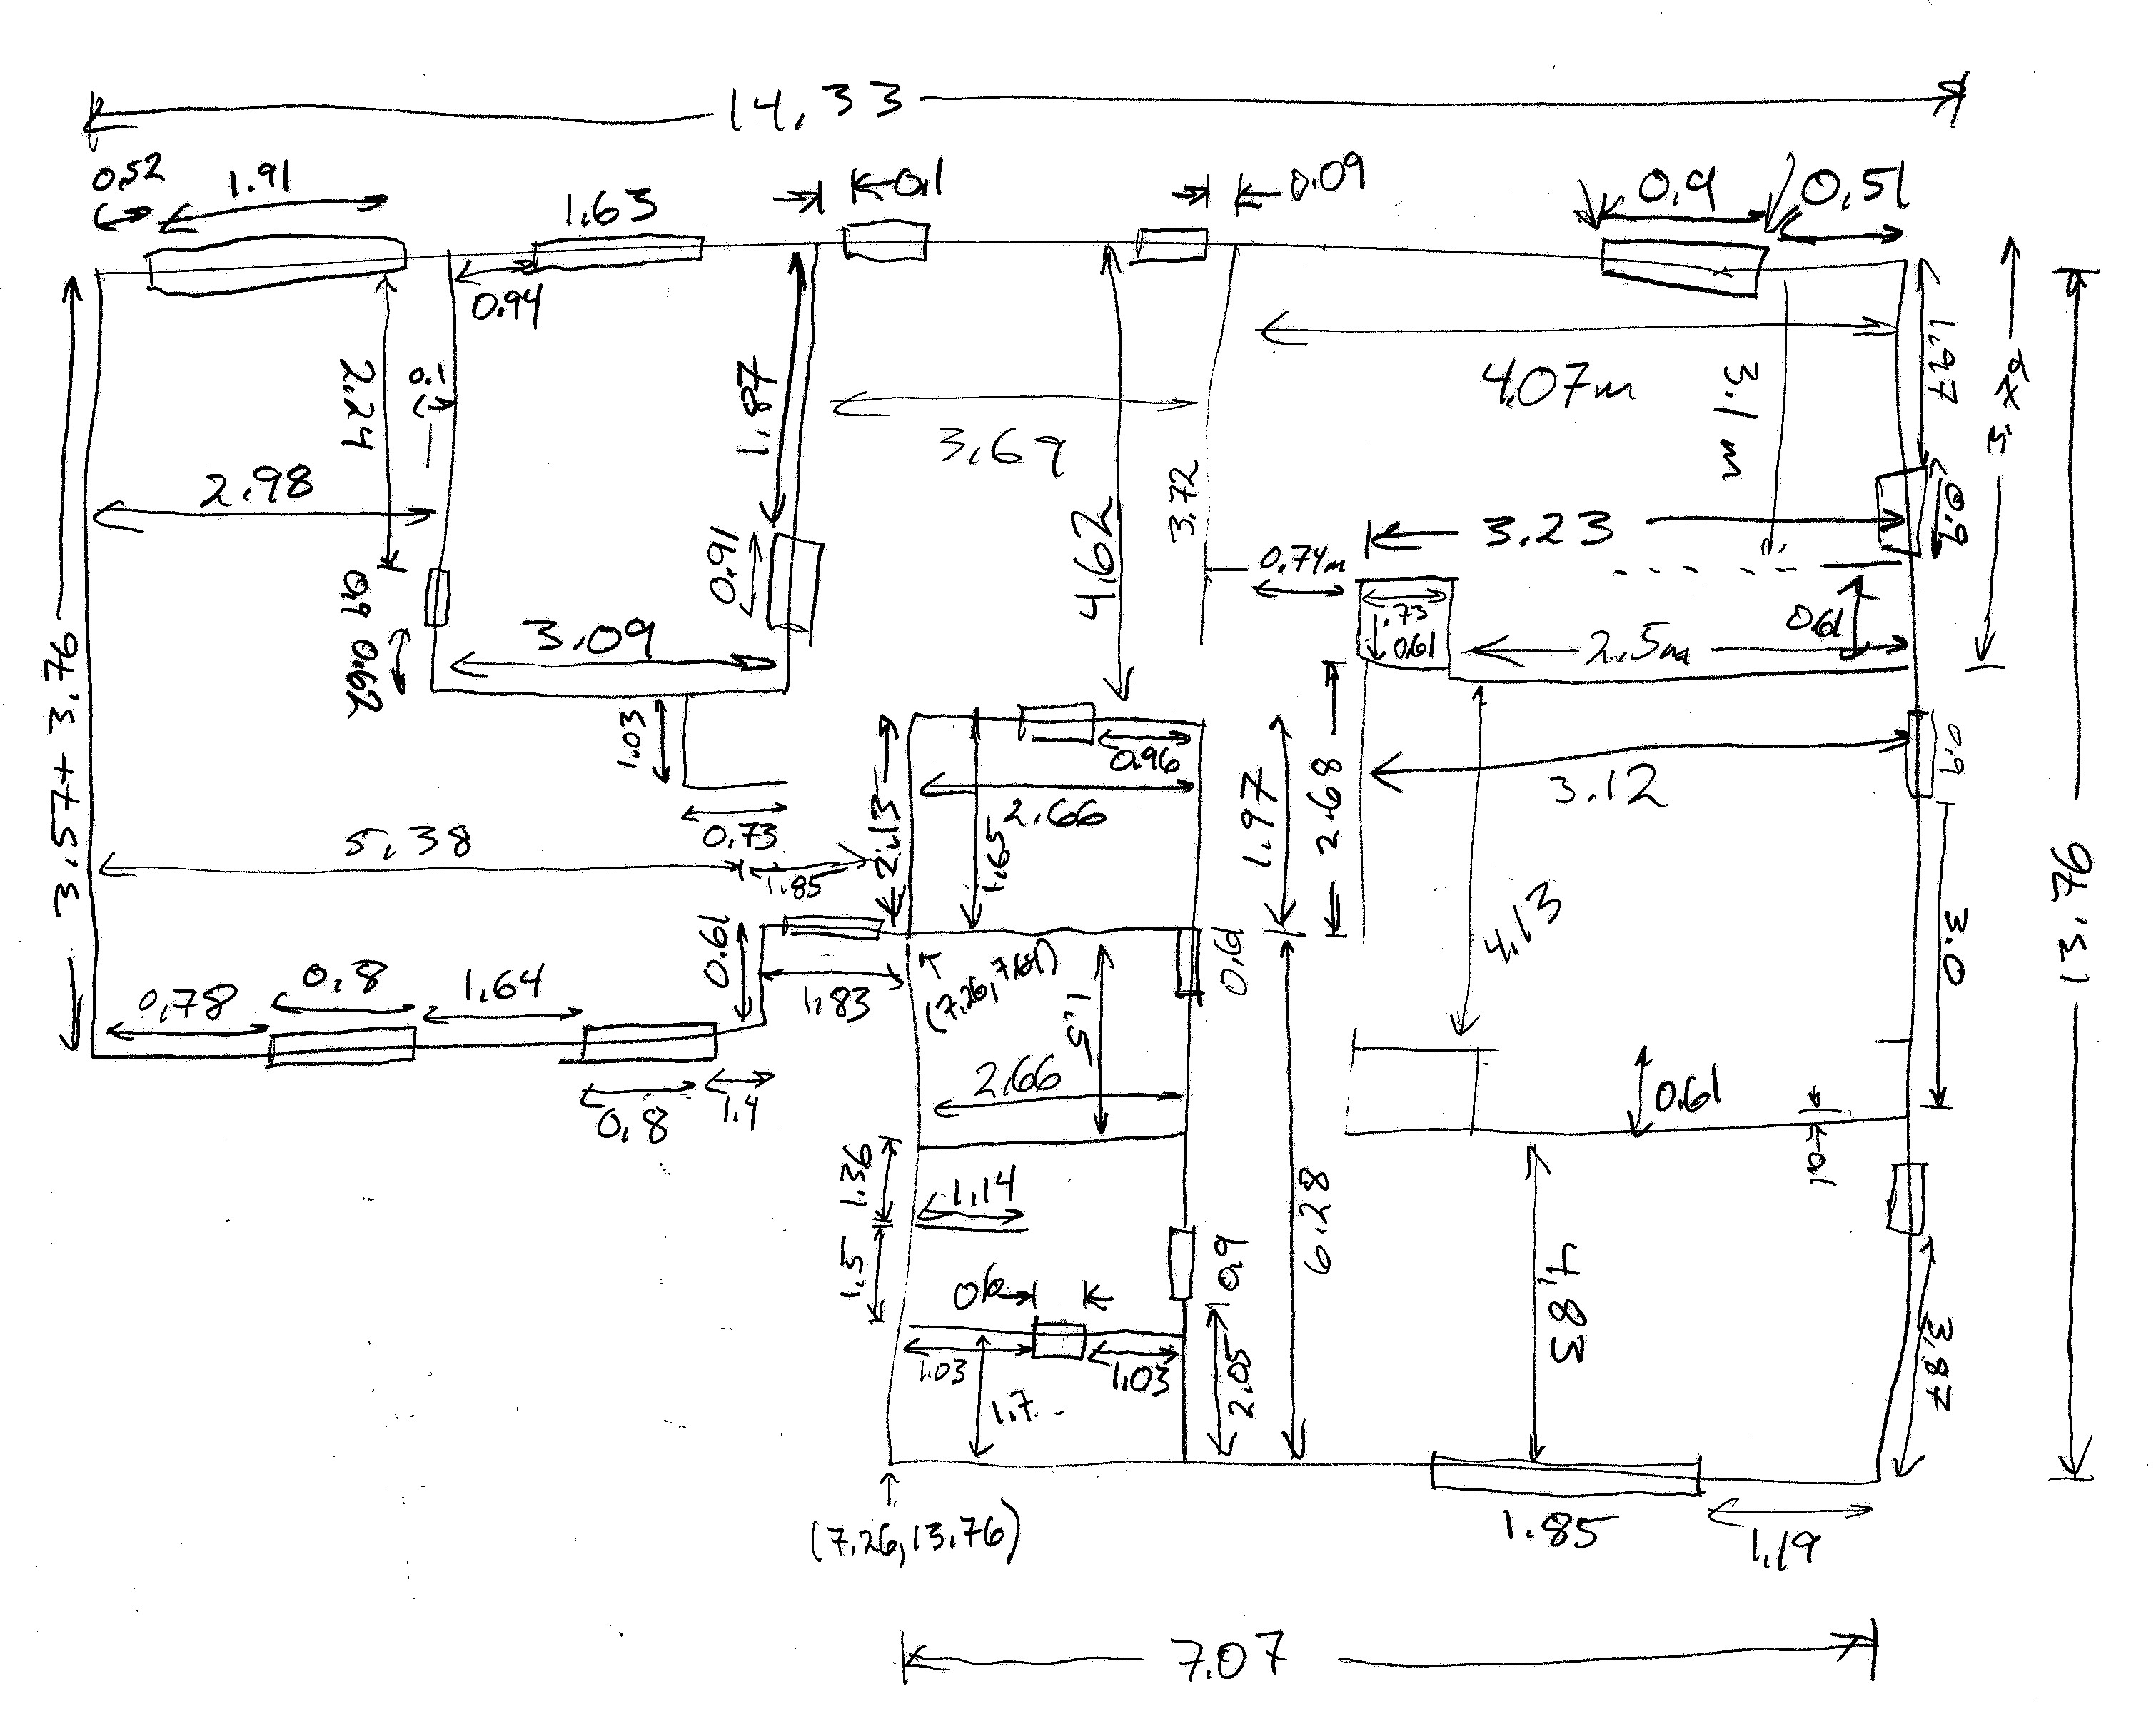
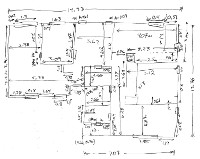 Figure 1. This is hand-drawn diagram of the house showing measurements of each wall. Figure 1. This is hand-drawn diagram of the house showing measurements of each wall.
|
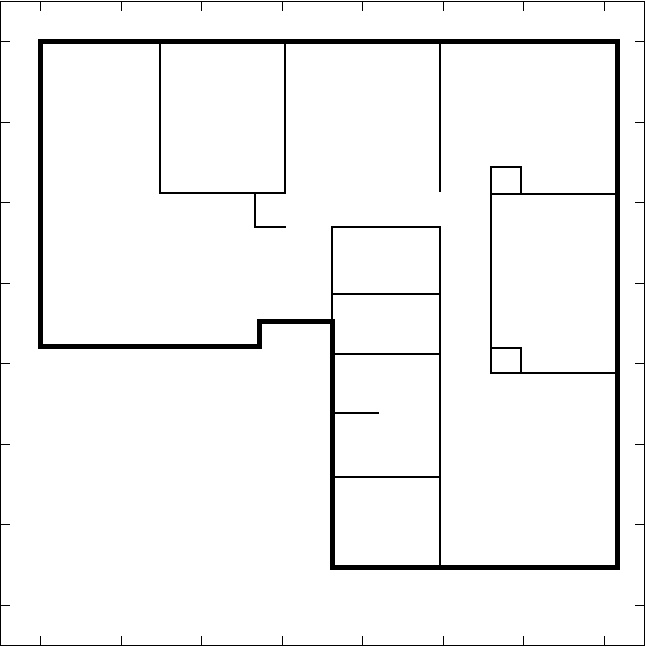
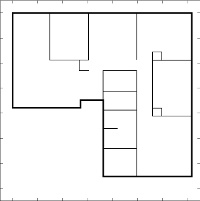 Figure 2. This is the Freemat-drawn map of the house using this basic script. Figure 2. This is the Freemat-drawn map of the house using this basic script.
|
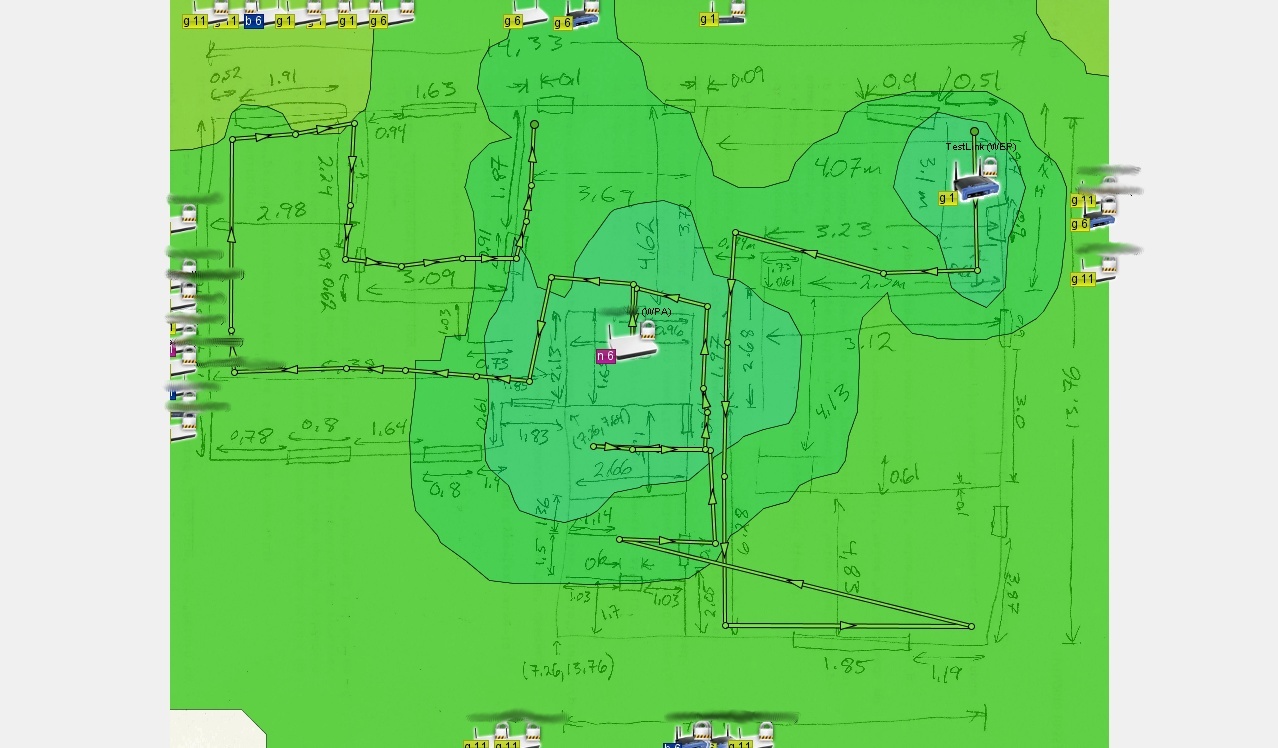
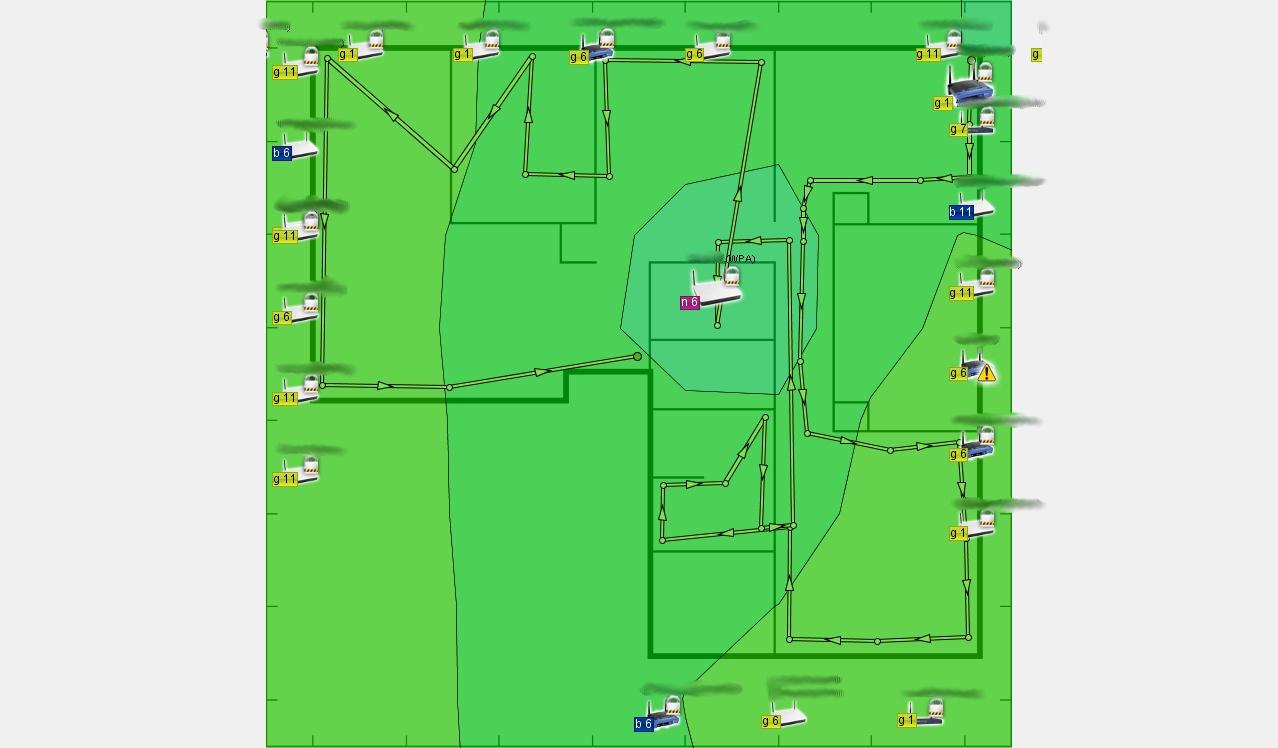
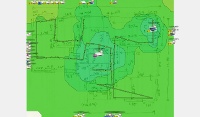 Figure 3. This is the how Heatmapper appears when overlaid on the hand-drawn map of my house. Figure 3. This is the how Heatmapper appears when overlaid on the hand-drawn map of my house.
|
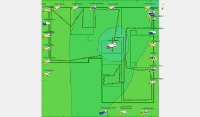 Figure 4. This is the how Heatmapper appears when overlaid on the Freemat-drawn map of my house. Figure 4. This is the how Heatmapper appears when overlaid on the Freemat-drawn map of my house.
|
Gary Schafer, 23 November 2010
As I said in one of my previous posts, I'm going to be mapping the wireless environment in my house. I've chosen as one of the tools to do that a Windows-based program called Heatmapper. One of the things they recommend for using heatmapper is a map of the area in which you will be running Heatmapper. I don't happen to have one. When we bought our house several years back, none of the paperwork provided a diagram of the layout of the house. Not to worry. I decided to make use of Freemat, my favorite math programming tool. Using a tape measure, I measured out each of the walls, both exterior and interior, as a series of (x,y) coordinates. Each (x,y) coordinate corresponds with an end of each wall. That gave me the basic map shown in Figure 1.
The diagram uses (x,y) coordinates with the origin in the upper, lefthand corner. I used the more-scientifically-accepted lengths of meters for each of the measurements. I used this to create a script that draws a basic diagram of the house. Note that I listed each point in positive numbers, then changed the sign for the y-coordinates when I drew each wall.
I started by using Heatmapper on the simple, hand-drawn diagram. Frankly, I thought it came out quite well. It accurately located the two wireless access points we have in the house. The first is the primary one that is part of our Verizon-provided Actiontec router. The second is a the Linksys WAP54G wireless access point.
Lastly, I used Heatmapper on the Freemat-drawn map, which would provide a more to-scale representation. It also accurately predicted the locations of both access points. However, I did note that there was a large variation of the access points outside of the house. In one case, the access point was listed on opposite side of the map.
One thing I need to point out about Heatmapper. It's mainly a WiFi access point mapping tool. It gives you a general indication of where access points are in a particular area. It also may provide an indication of the average signal level at a particular point. But it does not divide the area into frequency channels. So, it might say that the general signal level is XX dBm, but it does not tell you on which channels (frequencies) this information is actually accurate. Still, for freeware, it's pretty nice.
That's it for now. More to come.
What Just Happened...?
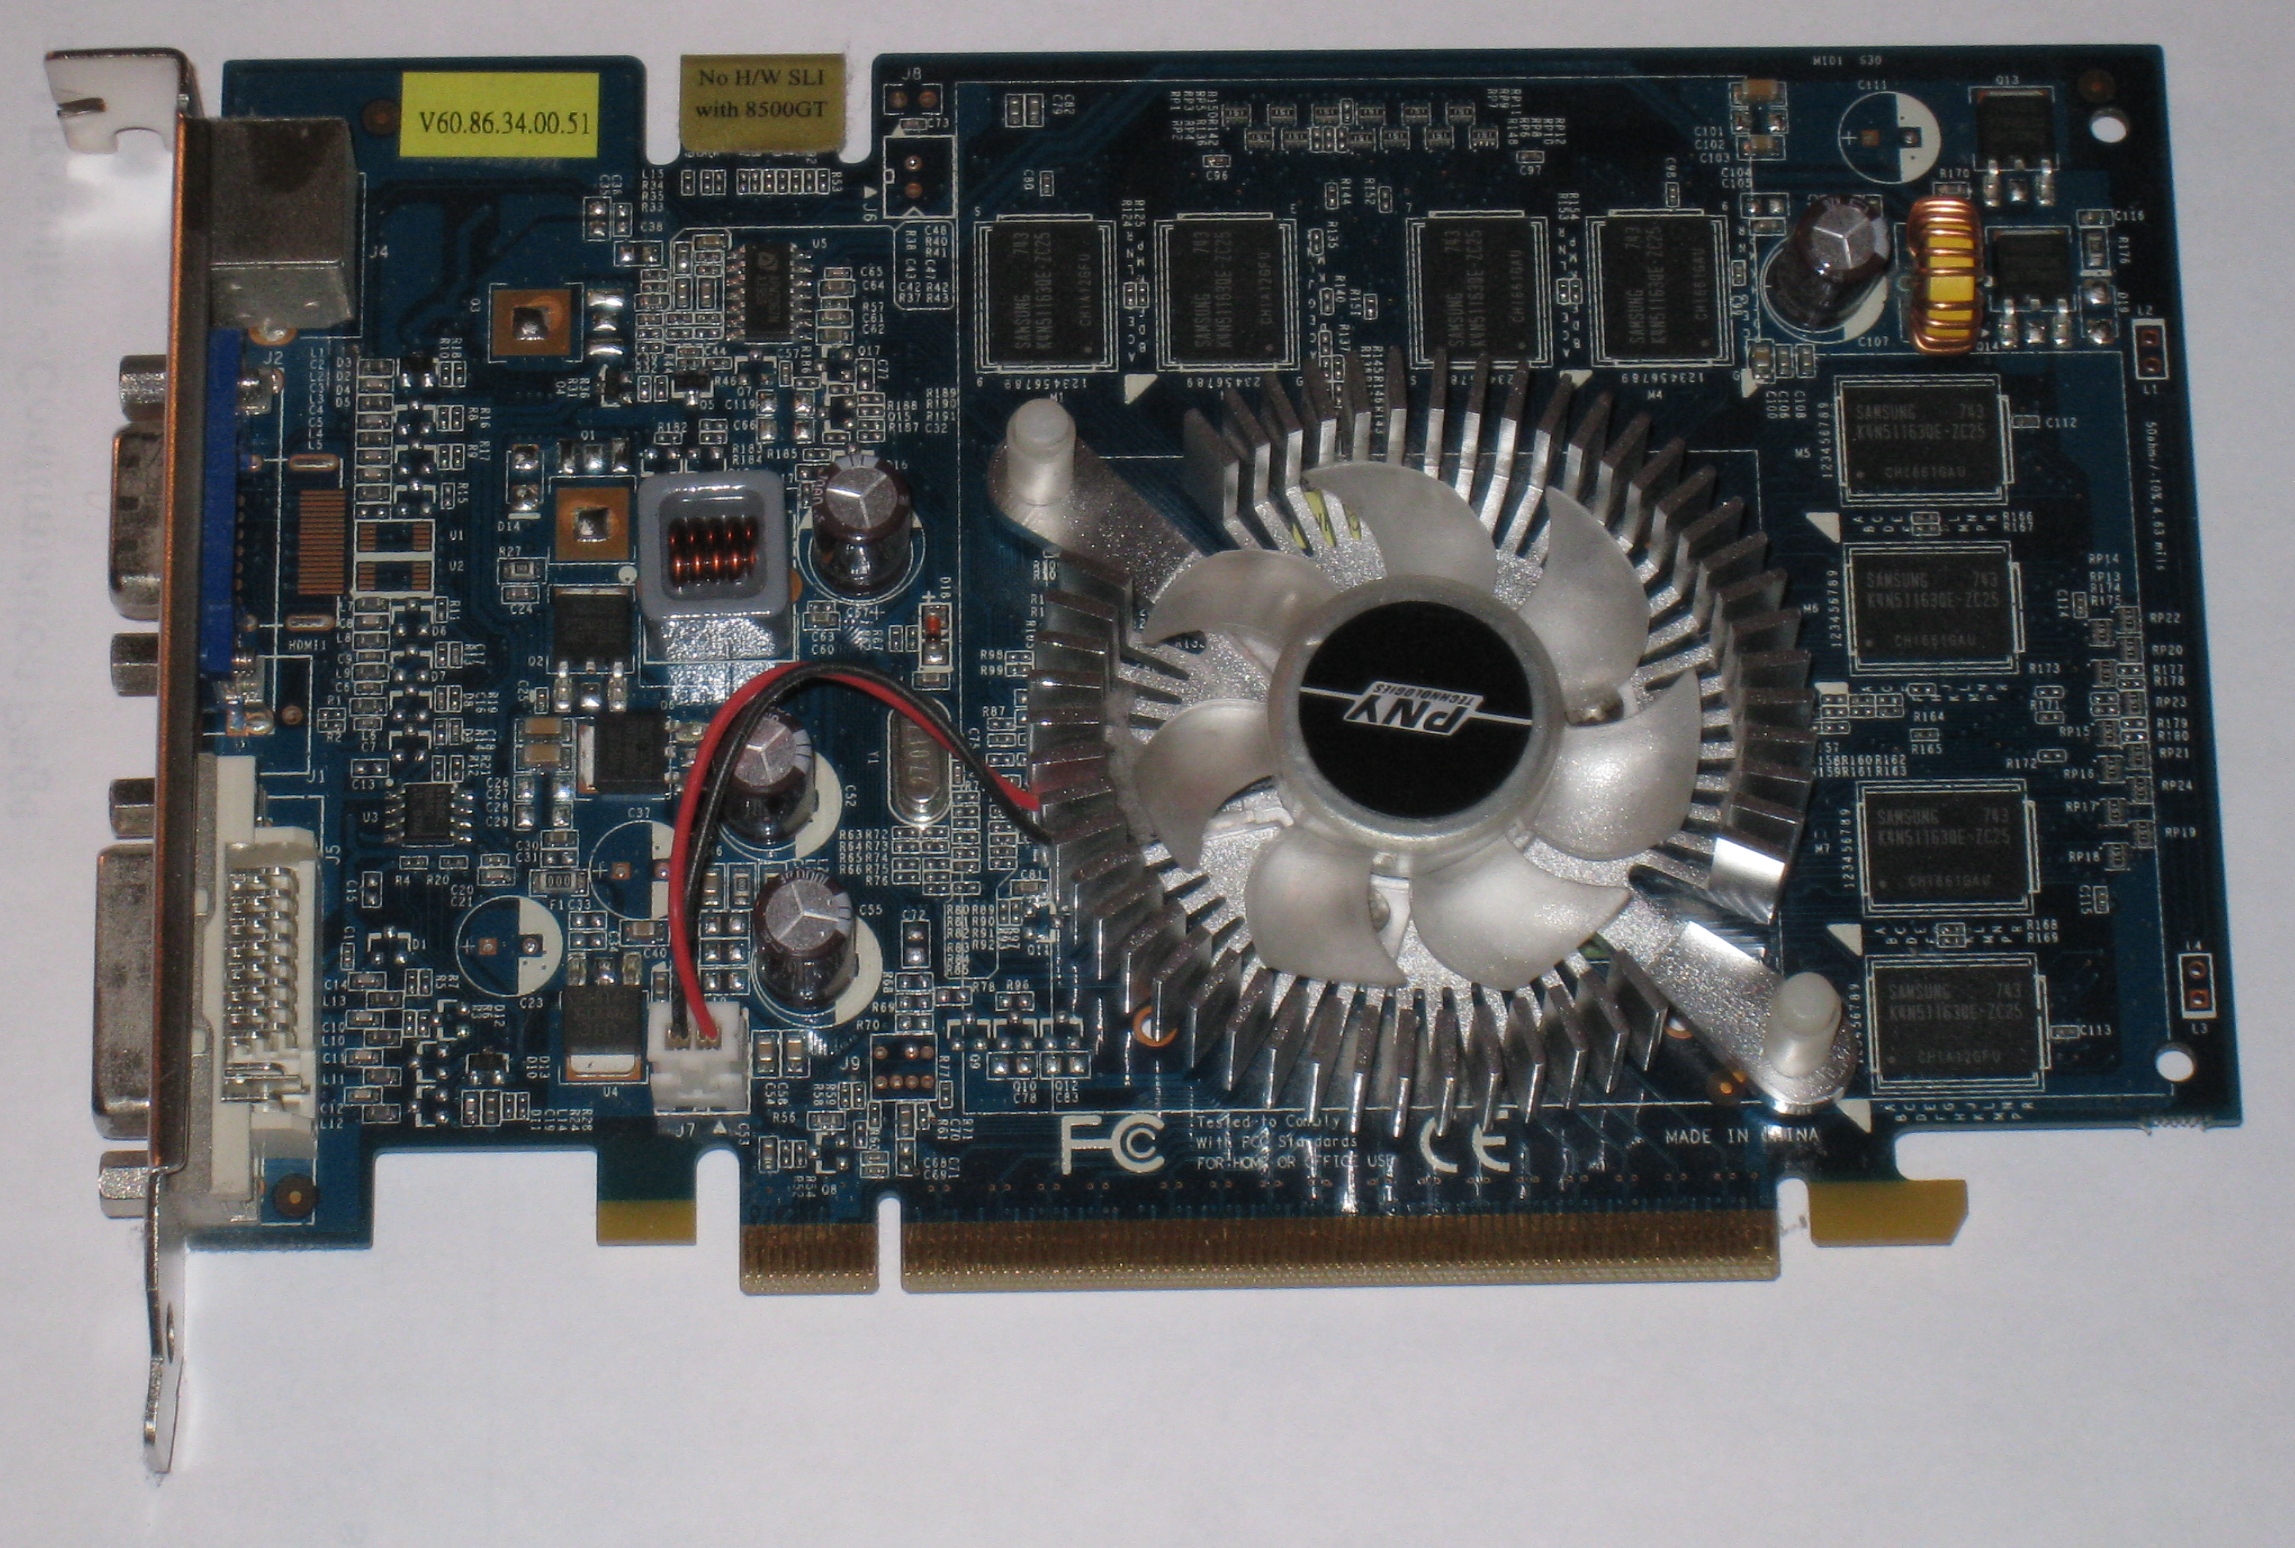
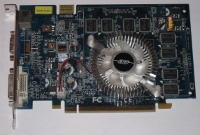 Figure 1. This was the problem, specifically the fan. It was making a whining noise, but since I couldn't tell (at the time) that it was just the video card, I shut down my server to be safe. Figure 1. This was the problem, specifically the fan. It was making a whining noise, but since I couldn't tell (at the time) that it was just the video card, I shut down my server to be safe.
|
Gary Schafer, 18 November 2010
If you're one of the (very small) number of people who check out this web site, you may have noticed that the site was down today. That also goes for several of the articles on the Freemat wiki. The images for those articles (some, but not all) are pulled from this same server. The short answer is I had to turn off the server before going to work this morning. The server, and hence the web site and images it hosts, were not available today. The long(er) answer is that, before going to work this morning, I heard one of the fans in the computer going bad. I've had a fan on the CPU go bad before. When it did, the CPU overheated and was ruined. I didn't want that to happen. All I knew was that one of the fans in my server, which is nothing more than an 8 year old Pentium 4 desktop computer, was going bad. I didn't know which one. Since I didn't have time to troubleshoot it, I turned off the server to be safe.
I just got home from work 15 minutes ago. I was able to troubleshoot the problem and found out it was a fan, but it was not the fan on the CPU. It was the fan on the video card. Since I don't use the video card anyway, I pulled it. A quick couple of connections (power and network are all the server needs), a power on, and problem solved. It's back online. Again, sorry for the inconvenience and thanks for staying with me!
My Own Microwave Range
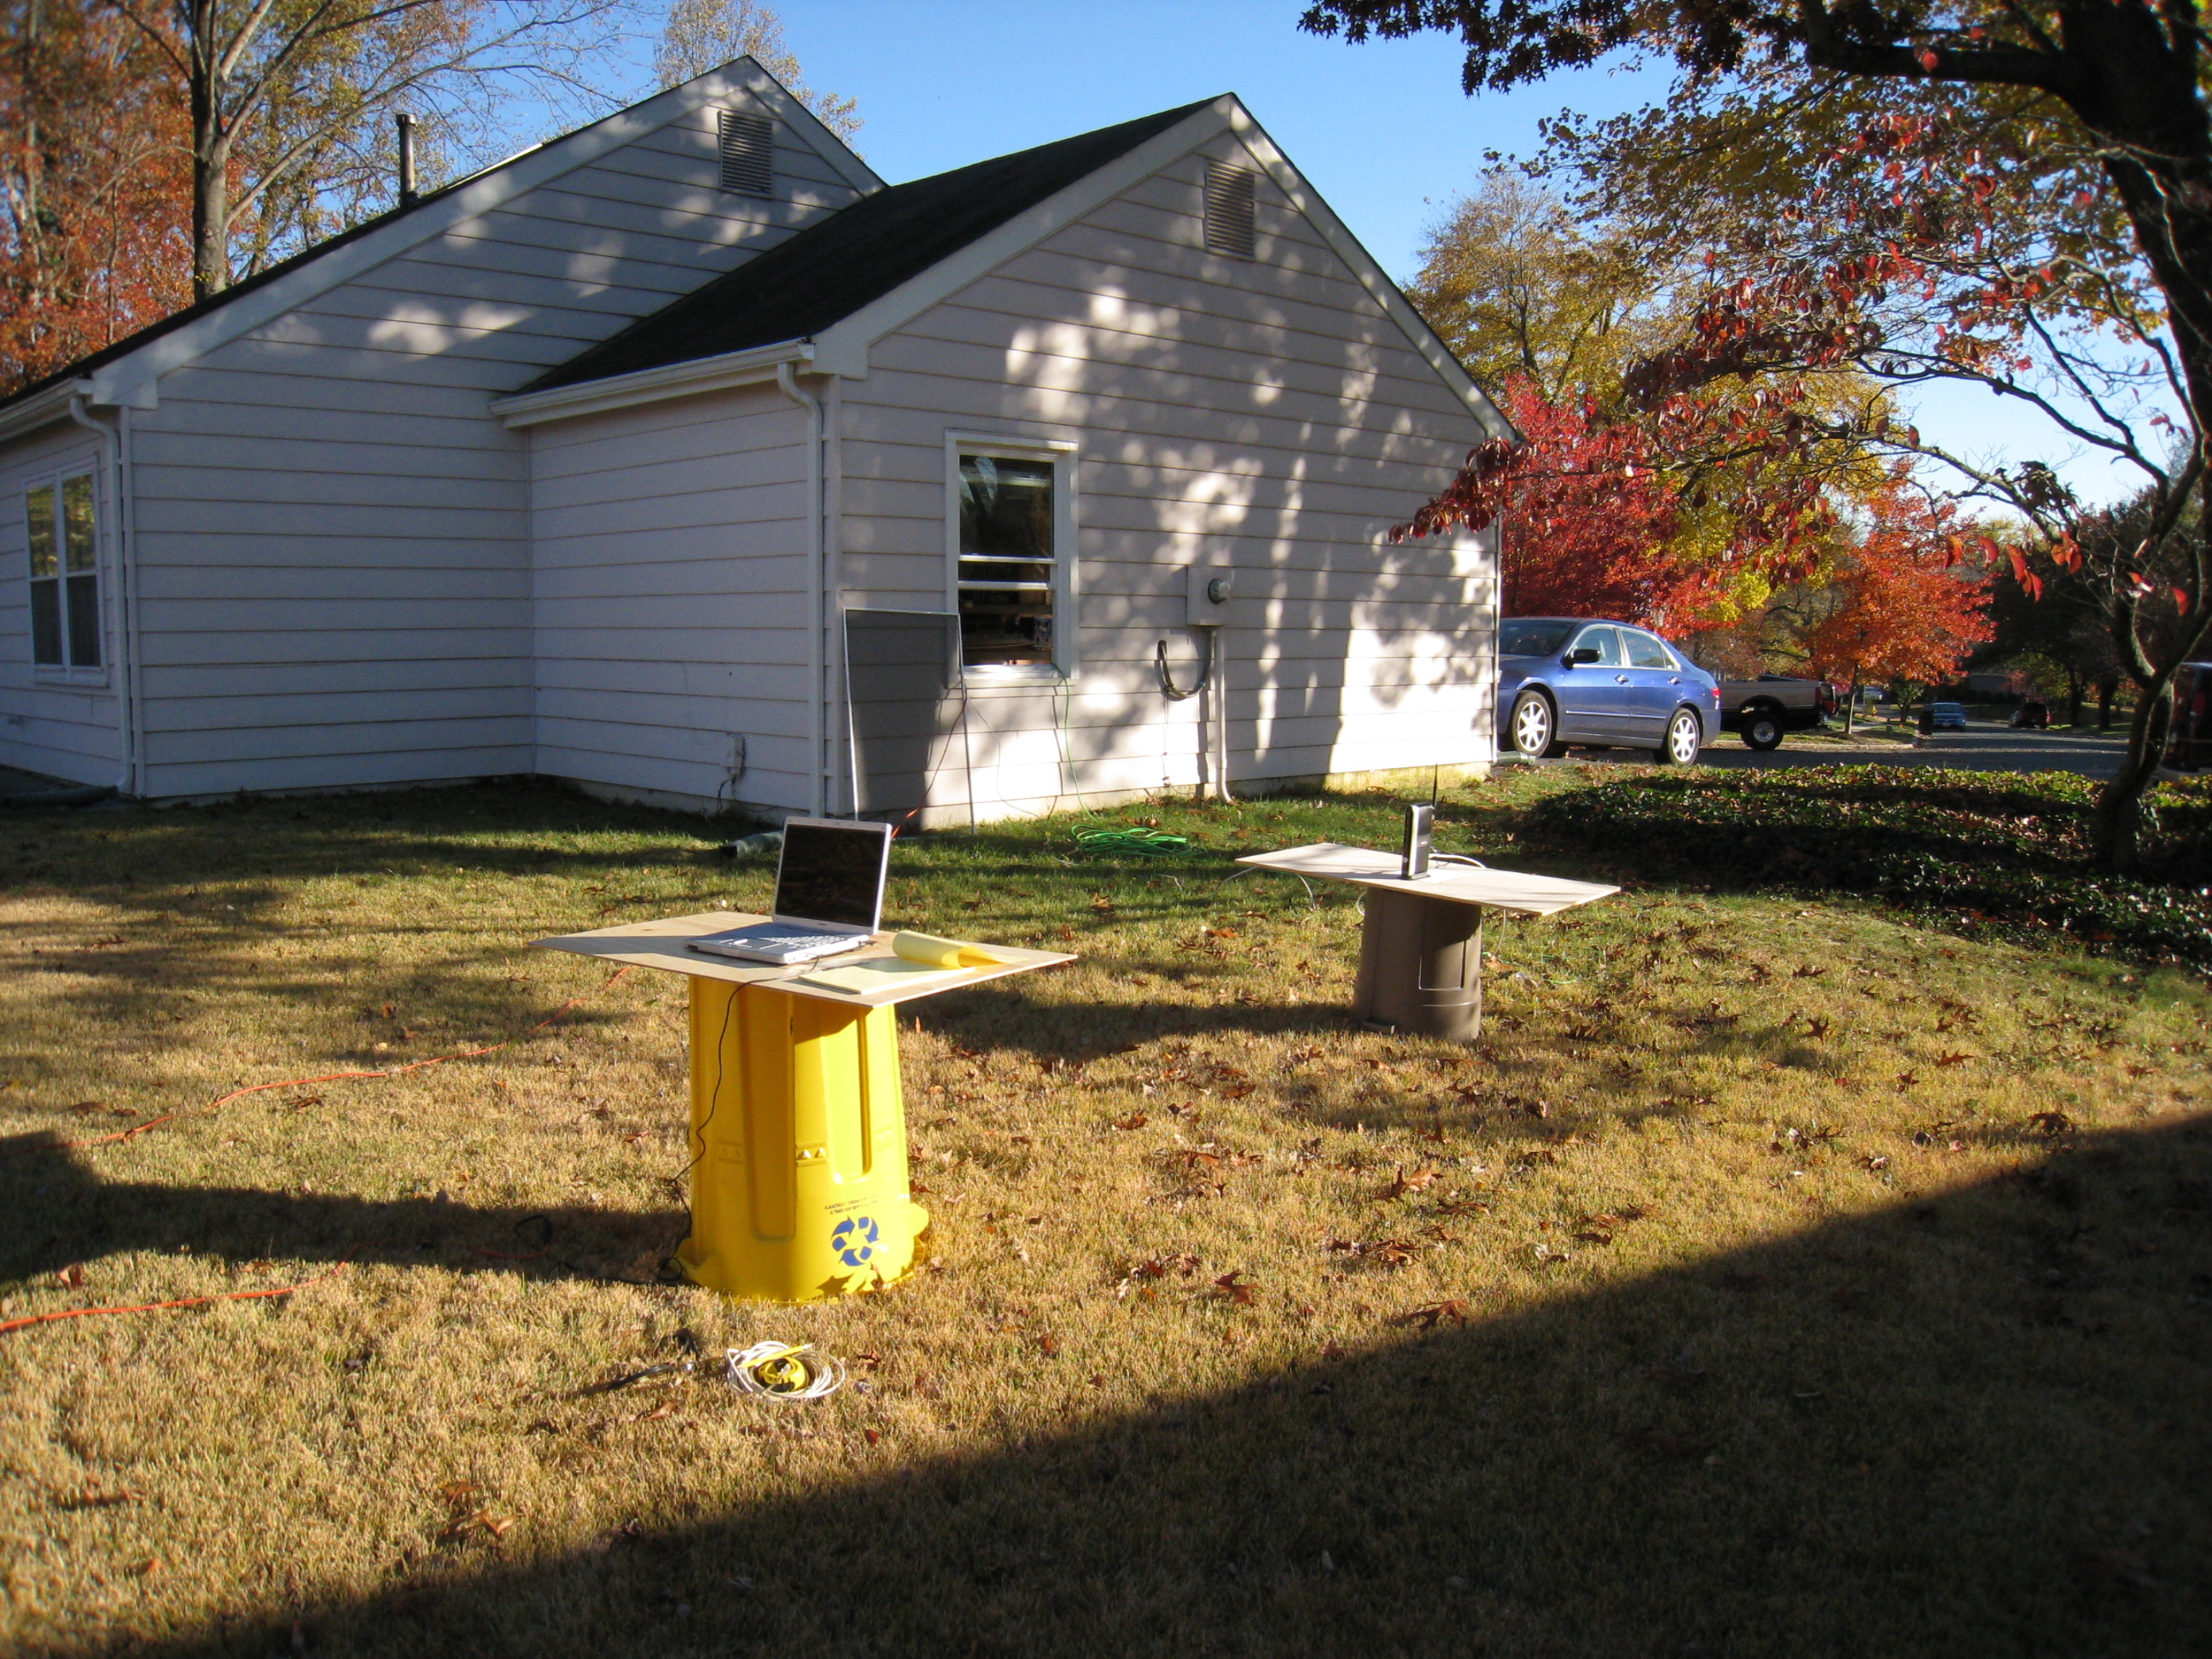
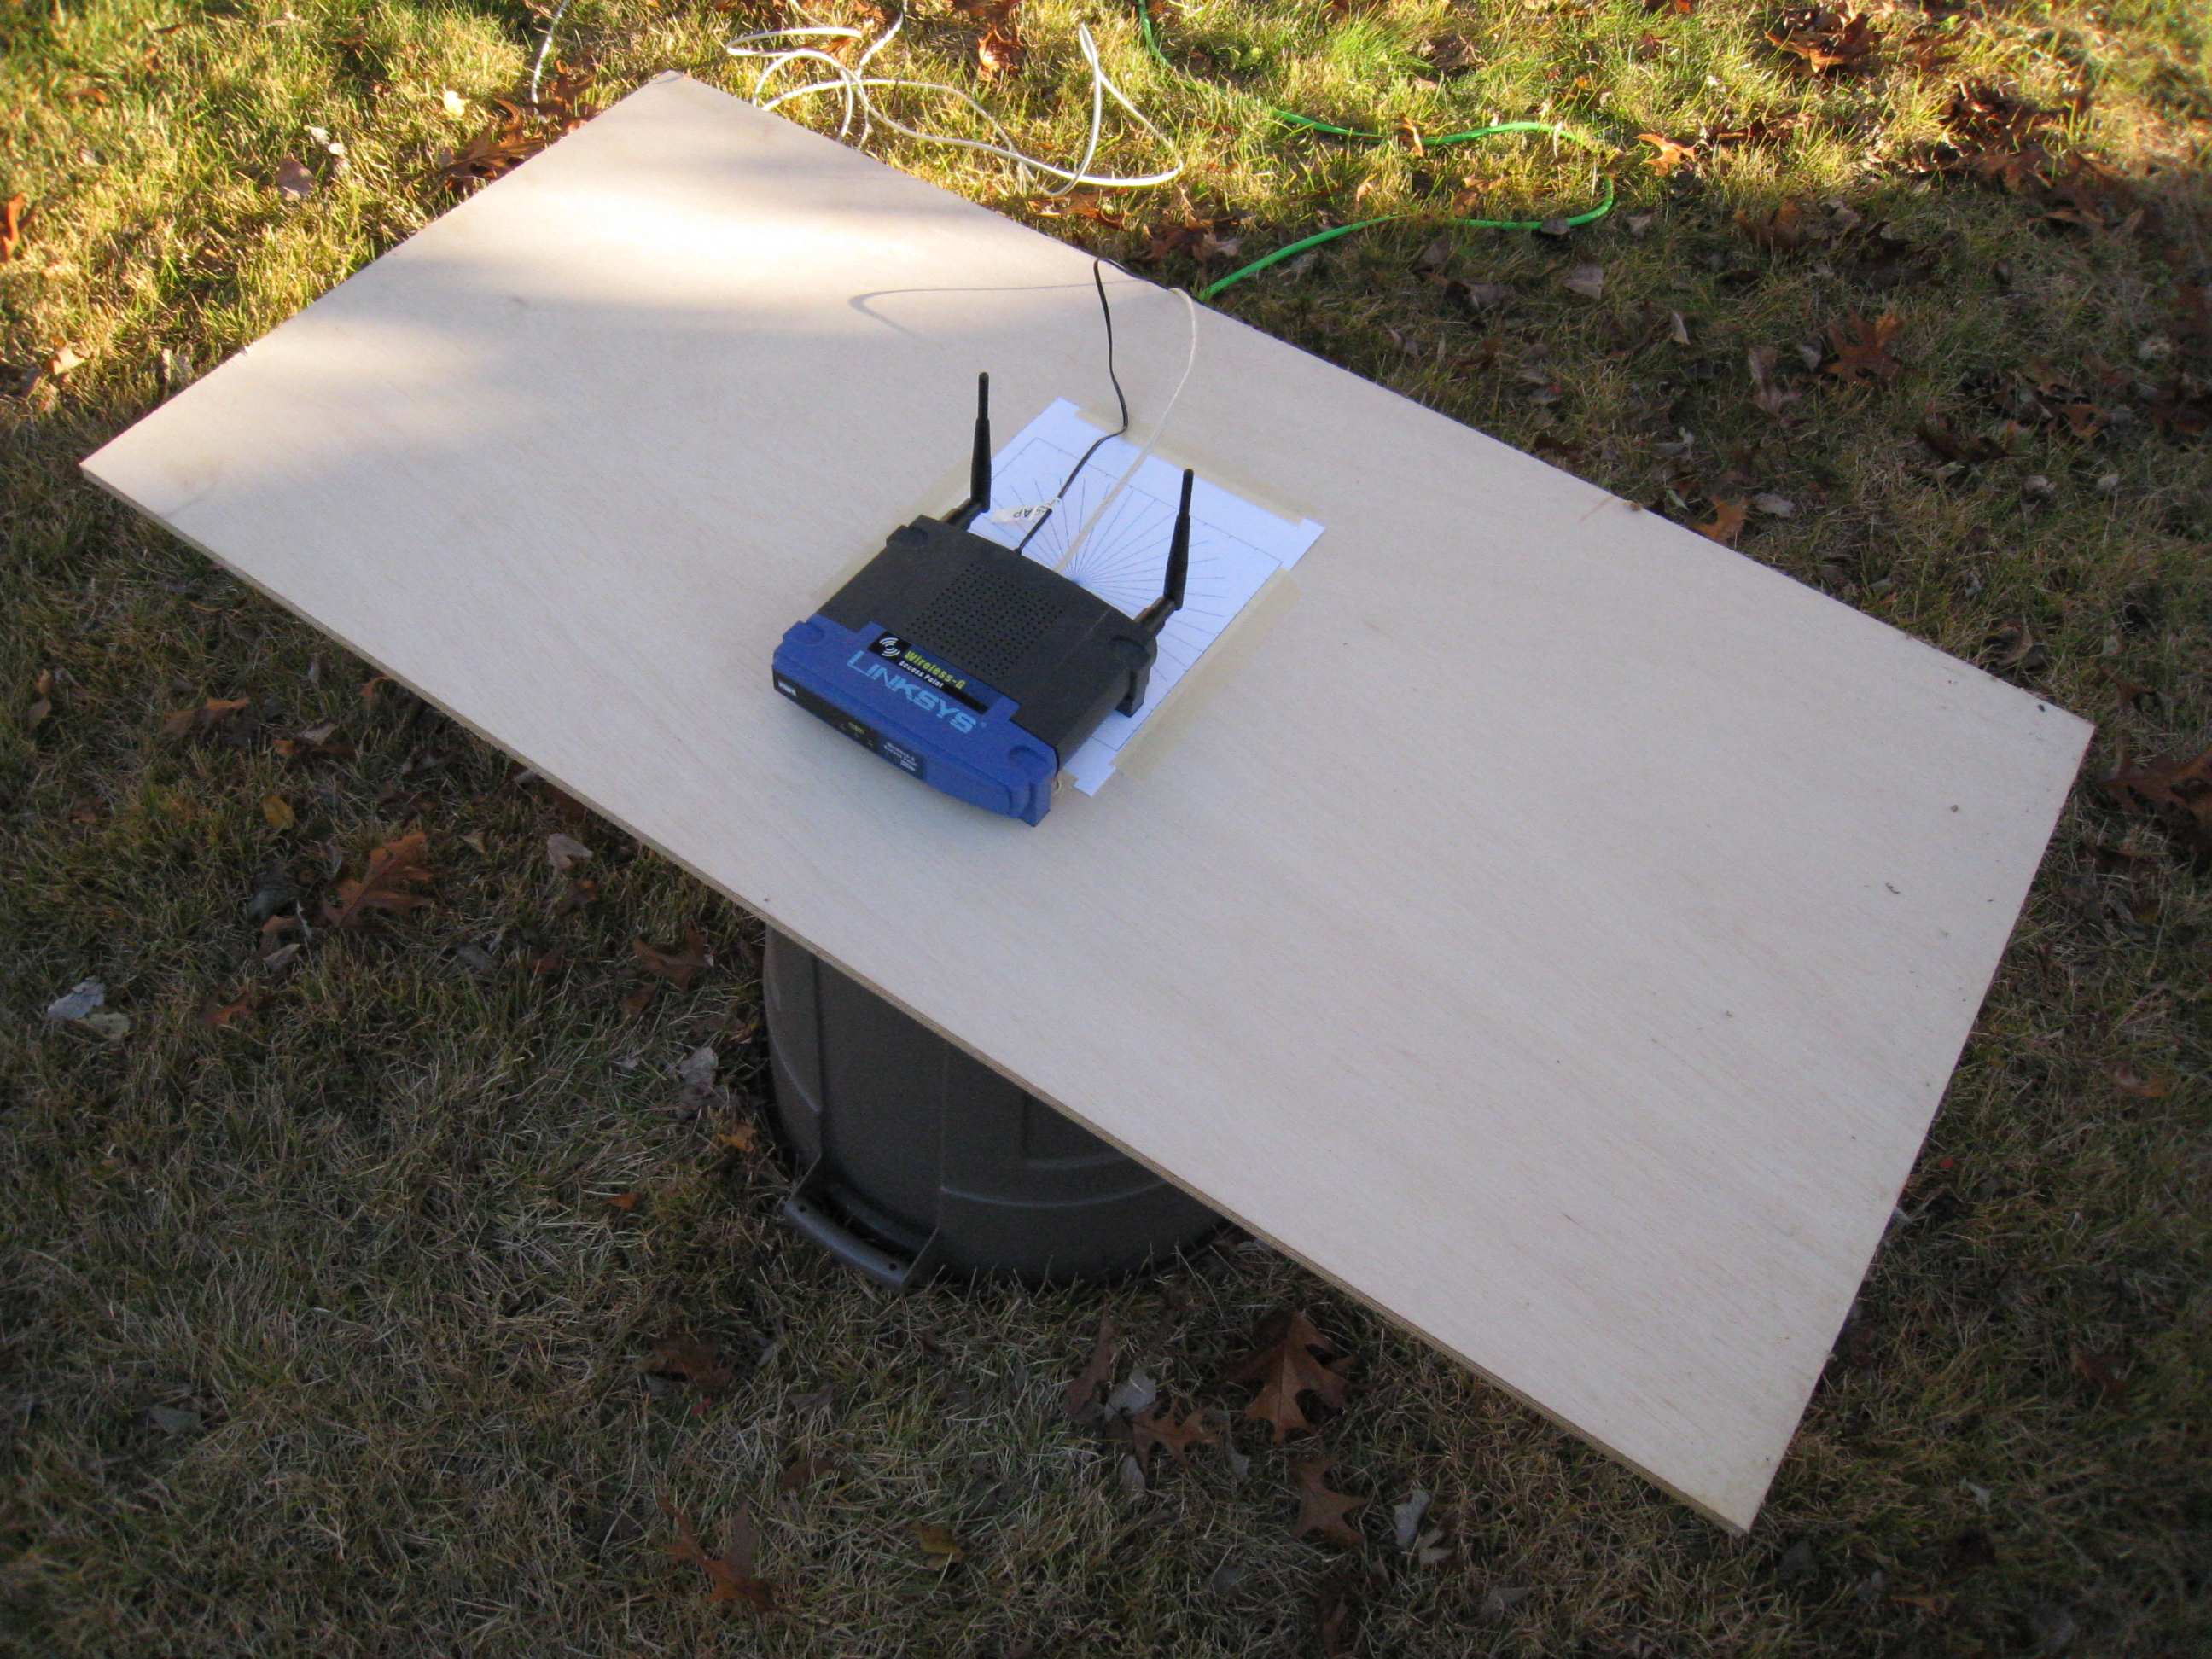
 Figure 1. This is the view of my homebrewed antenna range. The stands consist of a plastic garbage can and a plastic recycling bin. Figure 1. This is the view of my homebrewed antenna range. The stands consist of a plastic garbage can and a plastic recycling bin.
|
 Figure 2. This is another view of my homebrew microwave range. Figure 2. This is another view of my homebrew microwave range.
|
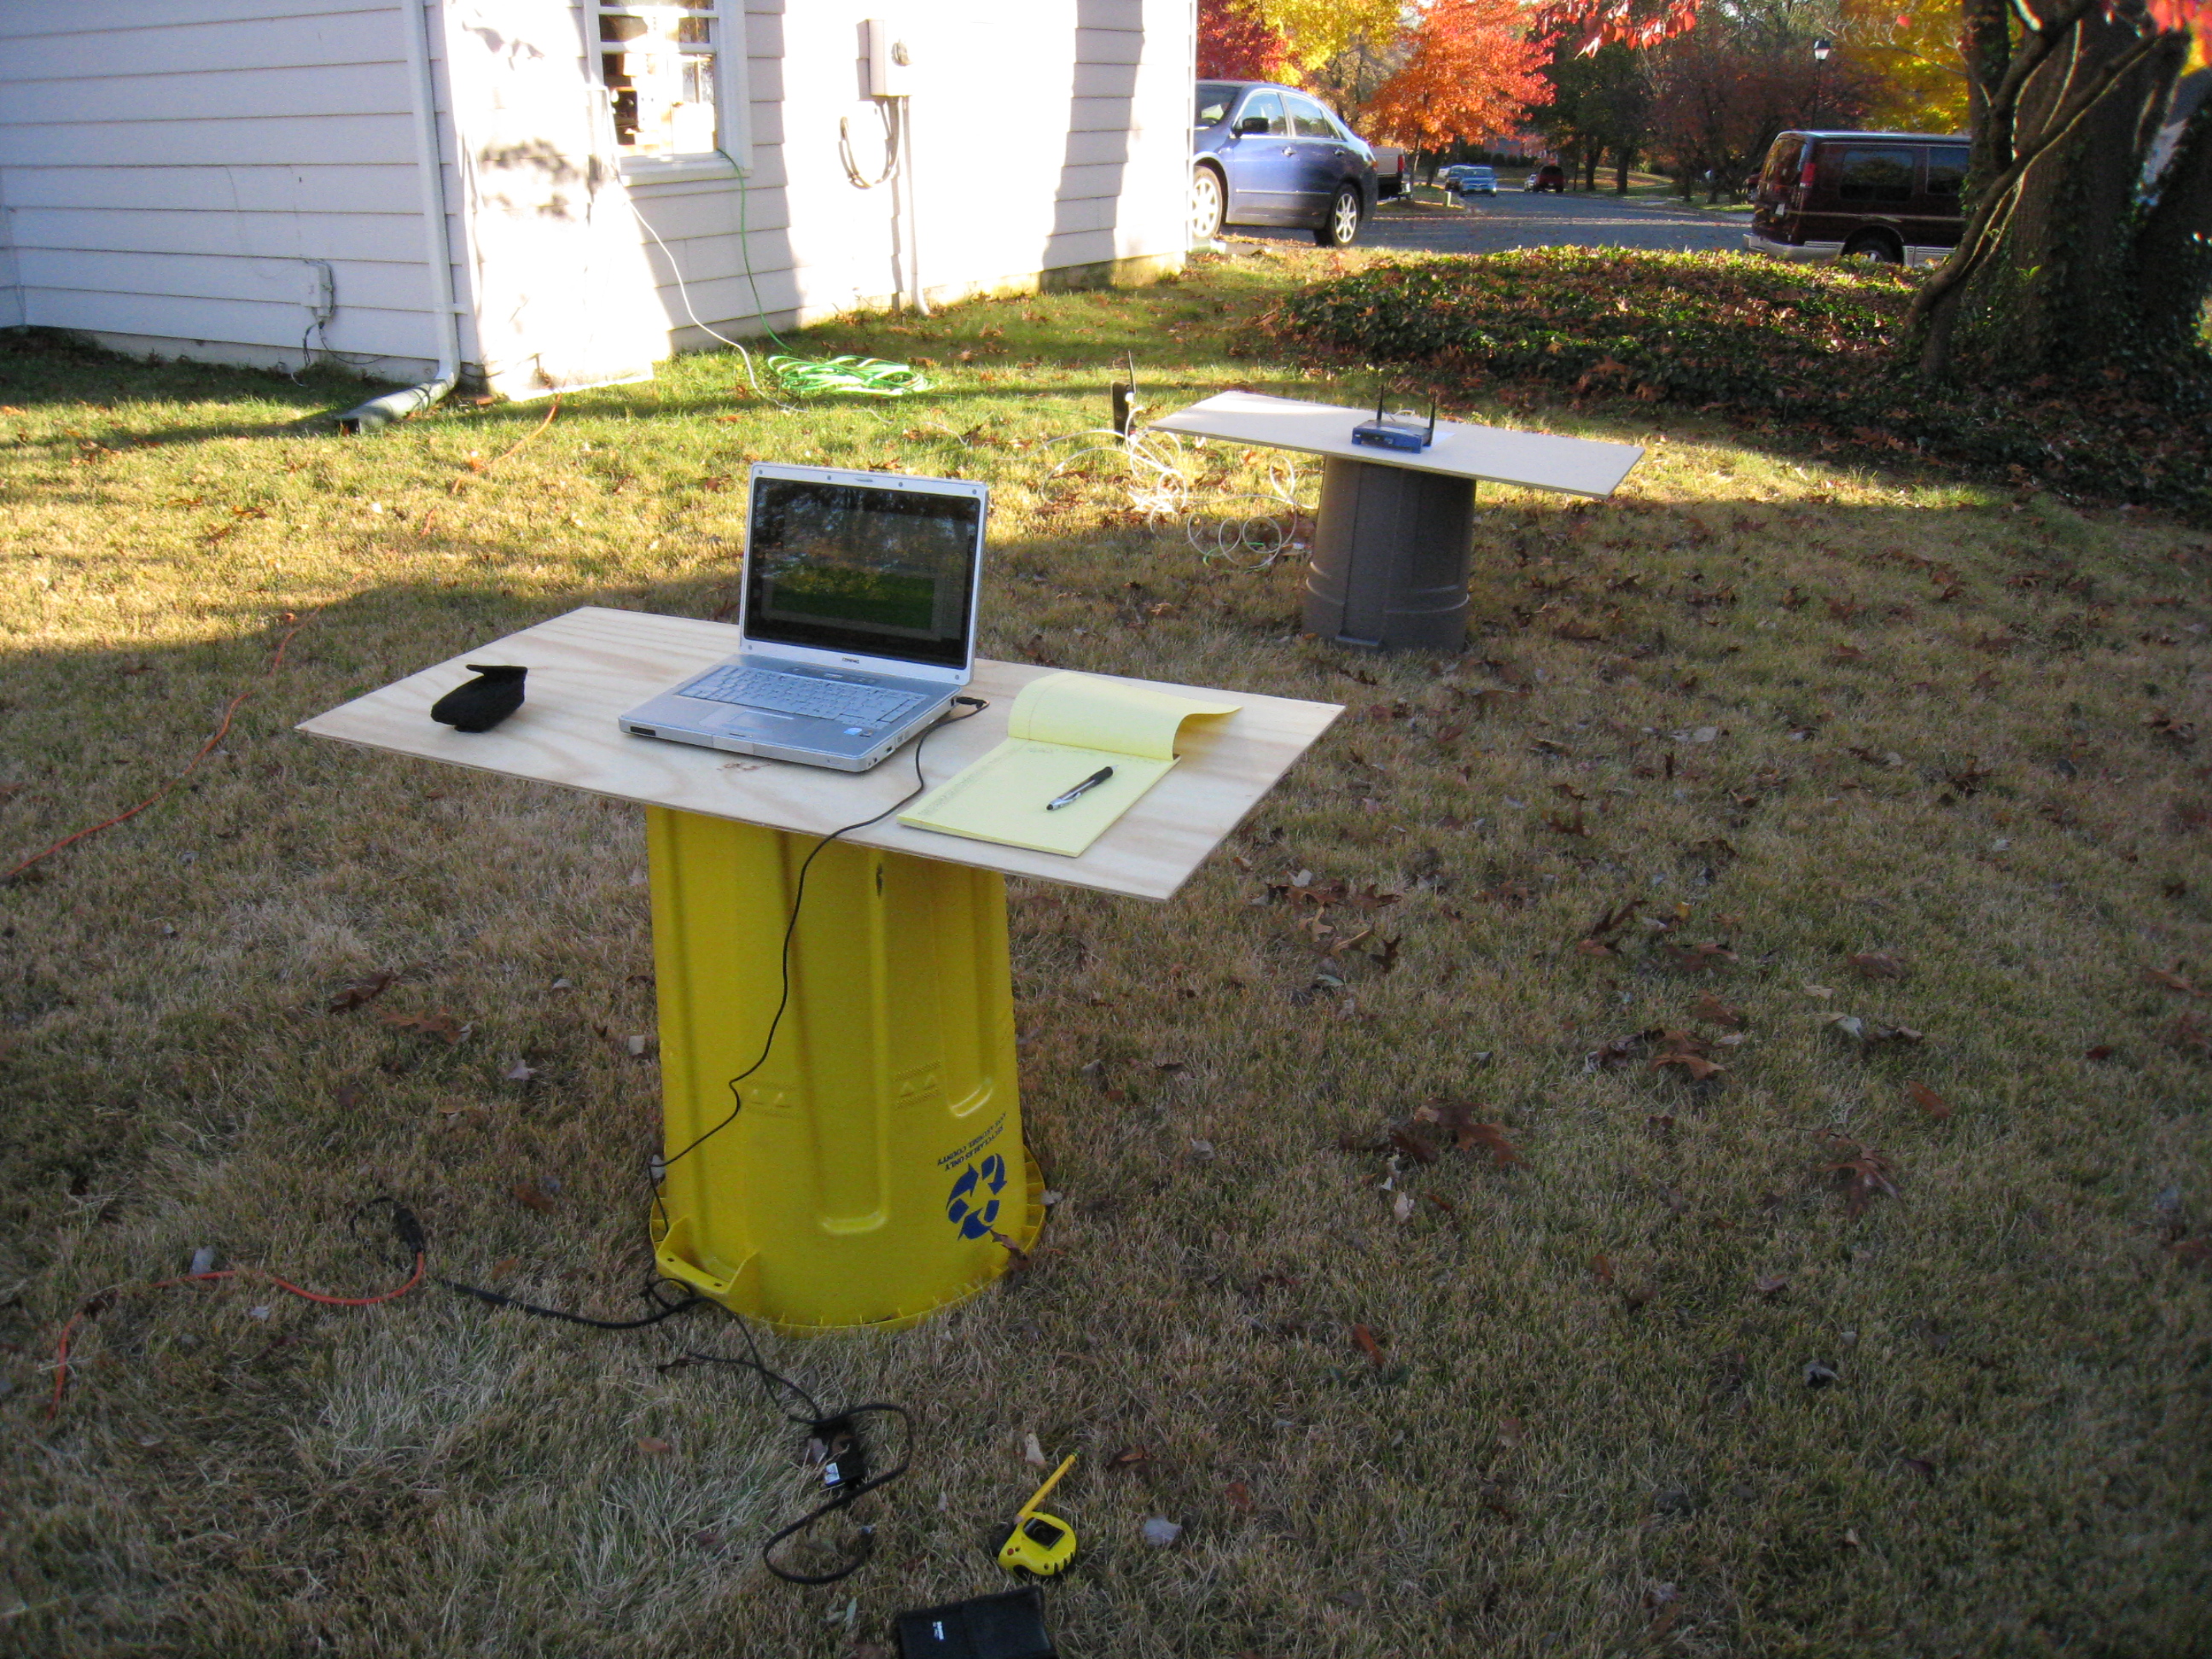
 Figure 3. This is the view of my Actiontec wireless router sitting on the radial spoke diagram. The spokes on the diagram are separated by 10 degrees of angle. Figure 3. This is the view of my Actiontec wireless router sitting on the radial spoke diagram. The spokes on the diagram are separated by 10 degrees of angle.
|
 Figure 4. This is the view with the Linksys WAP54G setup. Note the Actiontec on the ground to the left in the background. I had to have the Actiontec to provide the network connection that the Linksys needed to be active. Figure 4. This is the view with the Linksys WAP54G setup. Note the Actiontec on the ground to the left in the background. I had to have the Actiontec to provide the network connection that the Linksys needed to be active.
|
 Figure 5. This is a closer view of the Linksys WAP54G wireless access point. Figure 5. This is a closer view of the Linksys WAP54G wireless access point.
|
Gary Schafer, 11 November 2010
For one of my masters' classes, I'm doing a paper on the propagation of WiFi signals in a suburban home (namely, mine). One of the things I wanted to do was to calculate the horizontal-plane radiation pattern for my wireless router and a separate wireless access point. I needed to do this to get a baseline for the signal strength I can expect out of these two devices. I decided to calculate the pattern around a full 360 degrees in 10 degree increments. The router is my Verizon-provided Actiontec MI424-WR wireless router. The wireless access point is a several-years-old Linksys WAP54G. I set up a short, outdoor range in my sideyard. As tables, I used two upside down plastic bins, one that normally holds garbage and the other that normally holds my weekly recycling. On top, I set two flat pieces of wood, as shown in Figure 1 and Figure 2.
On top of one of the pieces of wood I set a radial spoke diagram showing lines every 10 degrees around a circle. I created this in just a few minutes using Freemat. I then taped it to the top of the board on one end. I then set the Actiontec router on top such that the antenna was set up in the center of the spokes, as shown in Figure 3.
The transmitter (the access point or AP) and receiver (my laptop) were set up 3 meters apart. The reason for this was that this ensured that the two were well into each other's far fields. My receiver was an older Compaq Presario C502 running a Broadcom BCM4311 wireless chip. The operating system was Windows Vista running WiFi Hopper. This utility provided signal strength readings as well as a graph over time showing how the signal strength varied.
Aside from the massive amount of running back and forth (rotate the AP 10 degrees, run to the laptop, wait 10 - 15 seconds, take a measurement, run back to the AP, repeat), the test was not taxing. The hardest part was having to setup my router, since it's Verizon, and Verizon uses MOCA (Multimedia over Coax Alliance). I had to have the router connected in order to have an Internet connection. While that was not absolutely necessary, per se, it was in a practical sense. My laptop tends to get... persnickety... when it is powered on but does not have an Internet connection. It just basically goes batty. So, I ran a separate coax cable from my Verizon ONT (optical network termination) to the router. Then I had to run a couple of power cords for the laptop and APs, as you can see in the various pictures.
In total, the tests for the two APs took about an hour and a half, not counting setup time. That only took a while because I kept getting interrupted by door-to-door salespeople. But it was a very nice day outside, so, as I said, it wasn't taxxing.
The results were that both the Actiontec and Linksys WAP were both fairly omnidirectional. The Actiontec, which is newer, provided an average of -31 dBm. The Linksys provided an average signal strength of -36 dBm. Again, both tests were run from a distance of 3 meters.
For my next trick, I'll be measuring the signal strength from points around my house to better understand the propagation environment. That will coming up soon, so stay tuned!
The End is Nearer for Windows
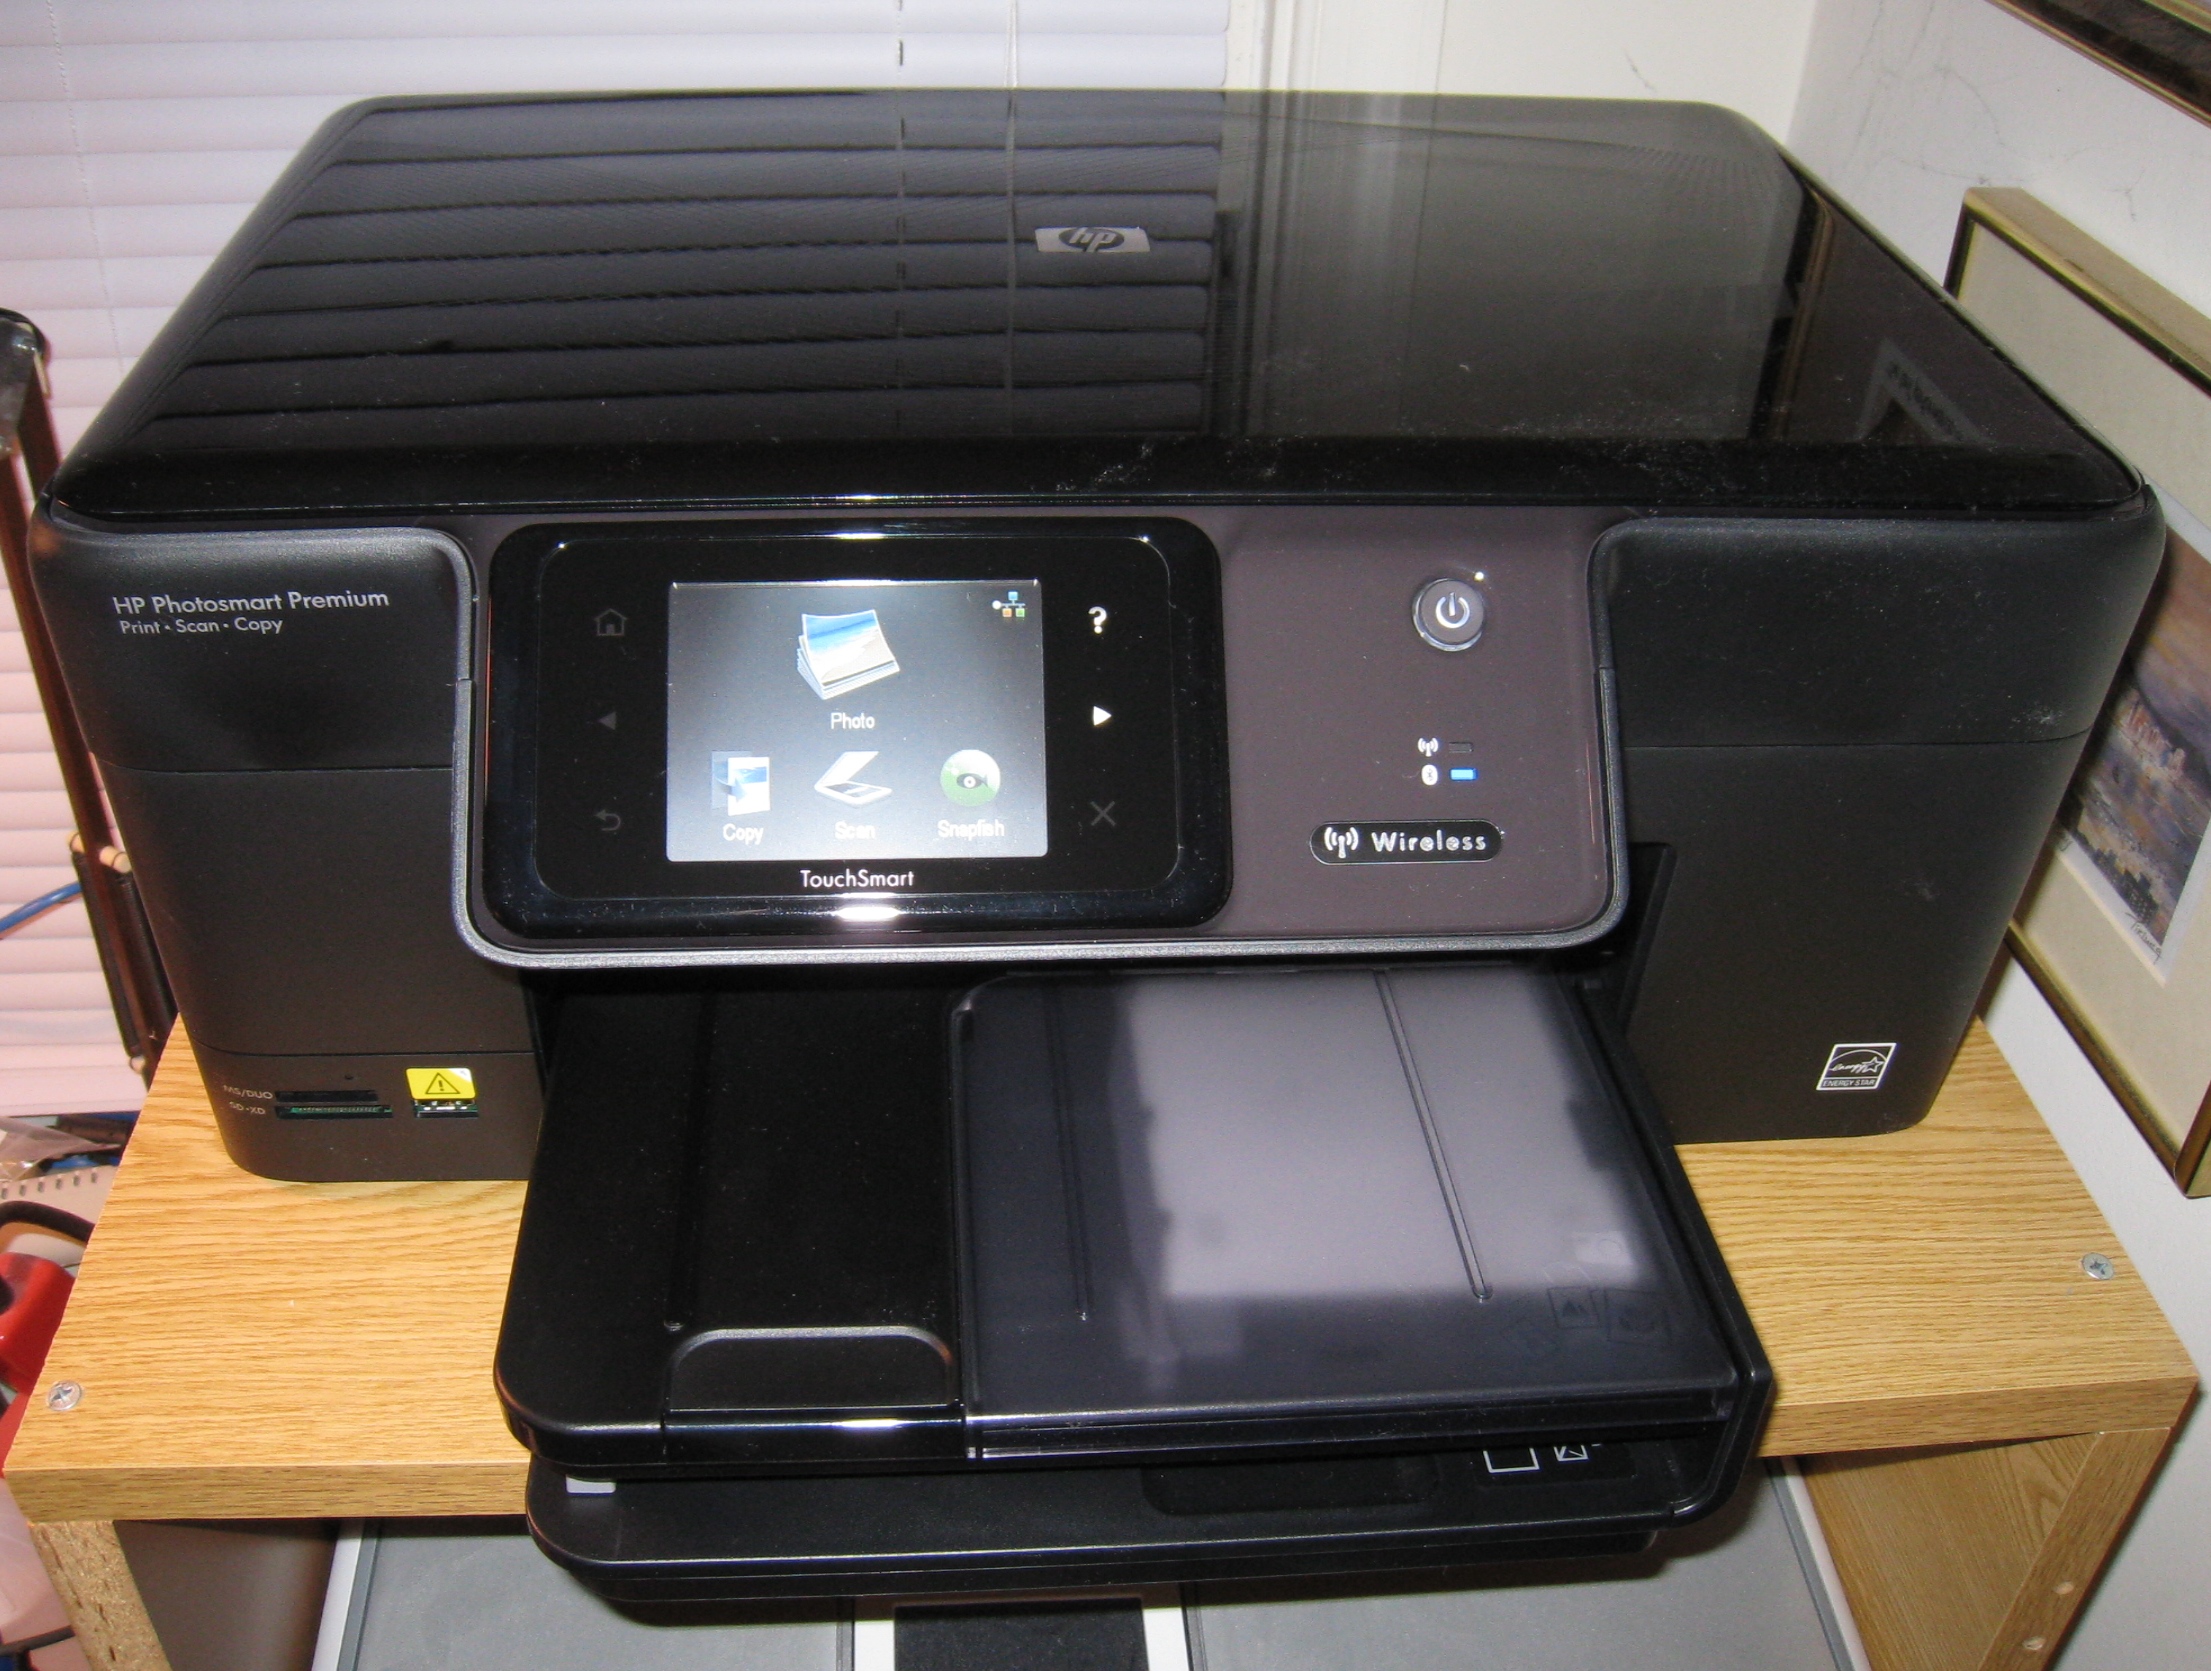
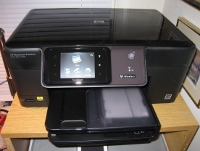 Figure 1. This is my new HP Photosmart Premium all-in-one printer, complete with flatbed scanner. It prints, scans and copies perfectly with my Ubuntu 10.10 Linux. Figure 1. This is my new HP Photosmart Premium all-in-one printer, complete with flatbed scanner. It prints, scans and copies perfectly with my Ubuntu 10.10 Linux.
|
Gary Schafer, 6 November 2010
Here's the short version. I just replaced my Visioneer 9320 Onetouch flatbed scanner with an HP Photosmart Premium all-in-one printer/scanner/copier. The Visioneer is no longer manufactured, its not being maintained, and there are no drivers for either Vista or Windows 7. I've been maintaining a virtual WinXP machine solely so that I can keep the Visioneer running. When I upgraded recently to Ubuntu Maverick Meerkat (10.10), I decided to take the plunge and upgrade my scanner as well. Flatbed scanners are not so common anymore; all-in-one printers are much more ubiquitous. I decided on the HP because I've had good luck with HPs. With Linux, they just work.
After installing and connecting everything (wired Ethernet, USB, and power), it took the new all-in-one almost 8 minutes to go through its self-calibration routine. And how long did it take to connect to my Linux-based computer? When I opened up the printer administration window ("System -> Administration -> Printing"), I found the printer was already installed. I didn't have to do anything. Thirty seconds after that, I'd confirmed that the scanner was working, too. Again, it just worked.
Note that, unlike Windows, it didn't require that I first install the drivers, then connect the printer, and all of that Windows-based jazz. No. I only had to connect the printer with the USB and network connections, plug in the power, and (Let's all say it together, shall we?) it just worked.
One more step away from Windows. One less thing that requires Windows to work. Yeah. I'm liking this.
UPDATE (11 November 2010): I was under the impression that using the flatbed scanner on this printer required the USB connection. Au contraire! It works just fine solely with a network connection. I found this out when I upgraded my laptop from Ubuntu 9.04 to 10.10 last night. Right after I got the wireless working, and with no other connections, I opened the "Simple Scan" program and did a test scan. It worked just fine.
The State of My Data
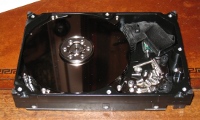 Figure 1. This is how my hard drive, with over 16 GB of hard-to-replace data, currently looks. Figure 1. This is how my hard drive, with over 16 GB of hard-to-replace data, currently looks.
|
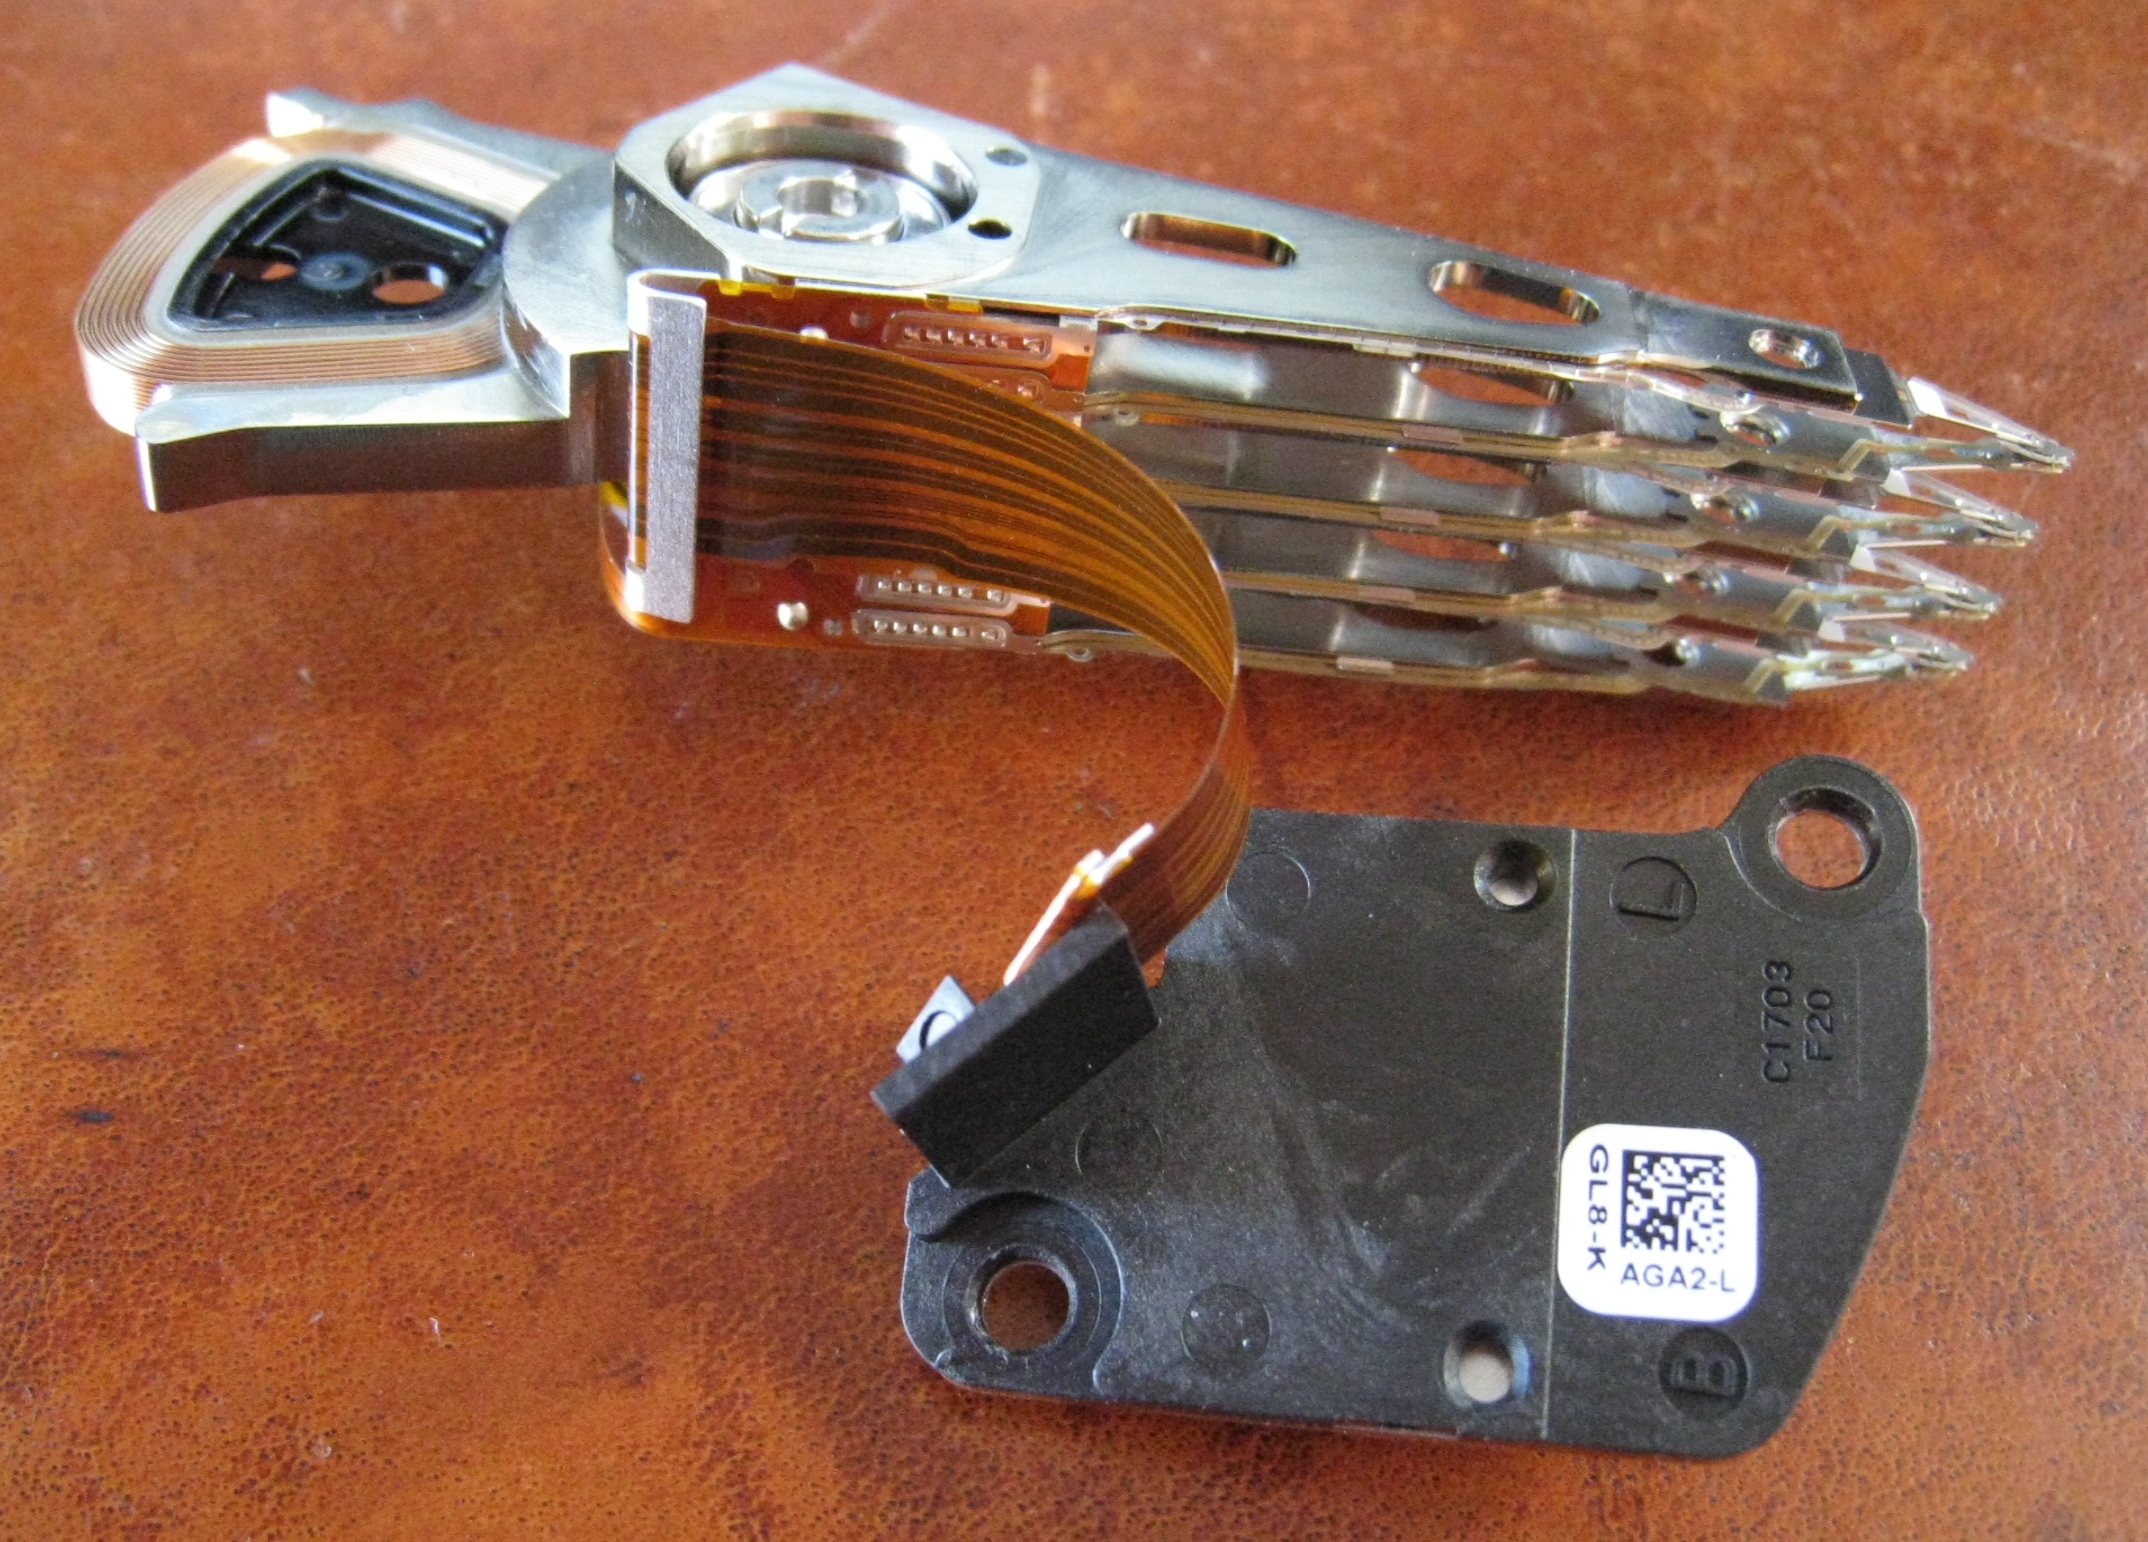
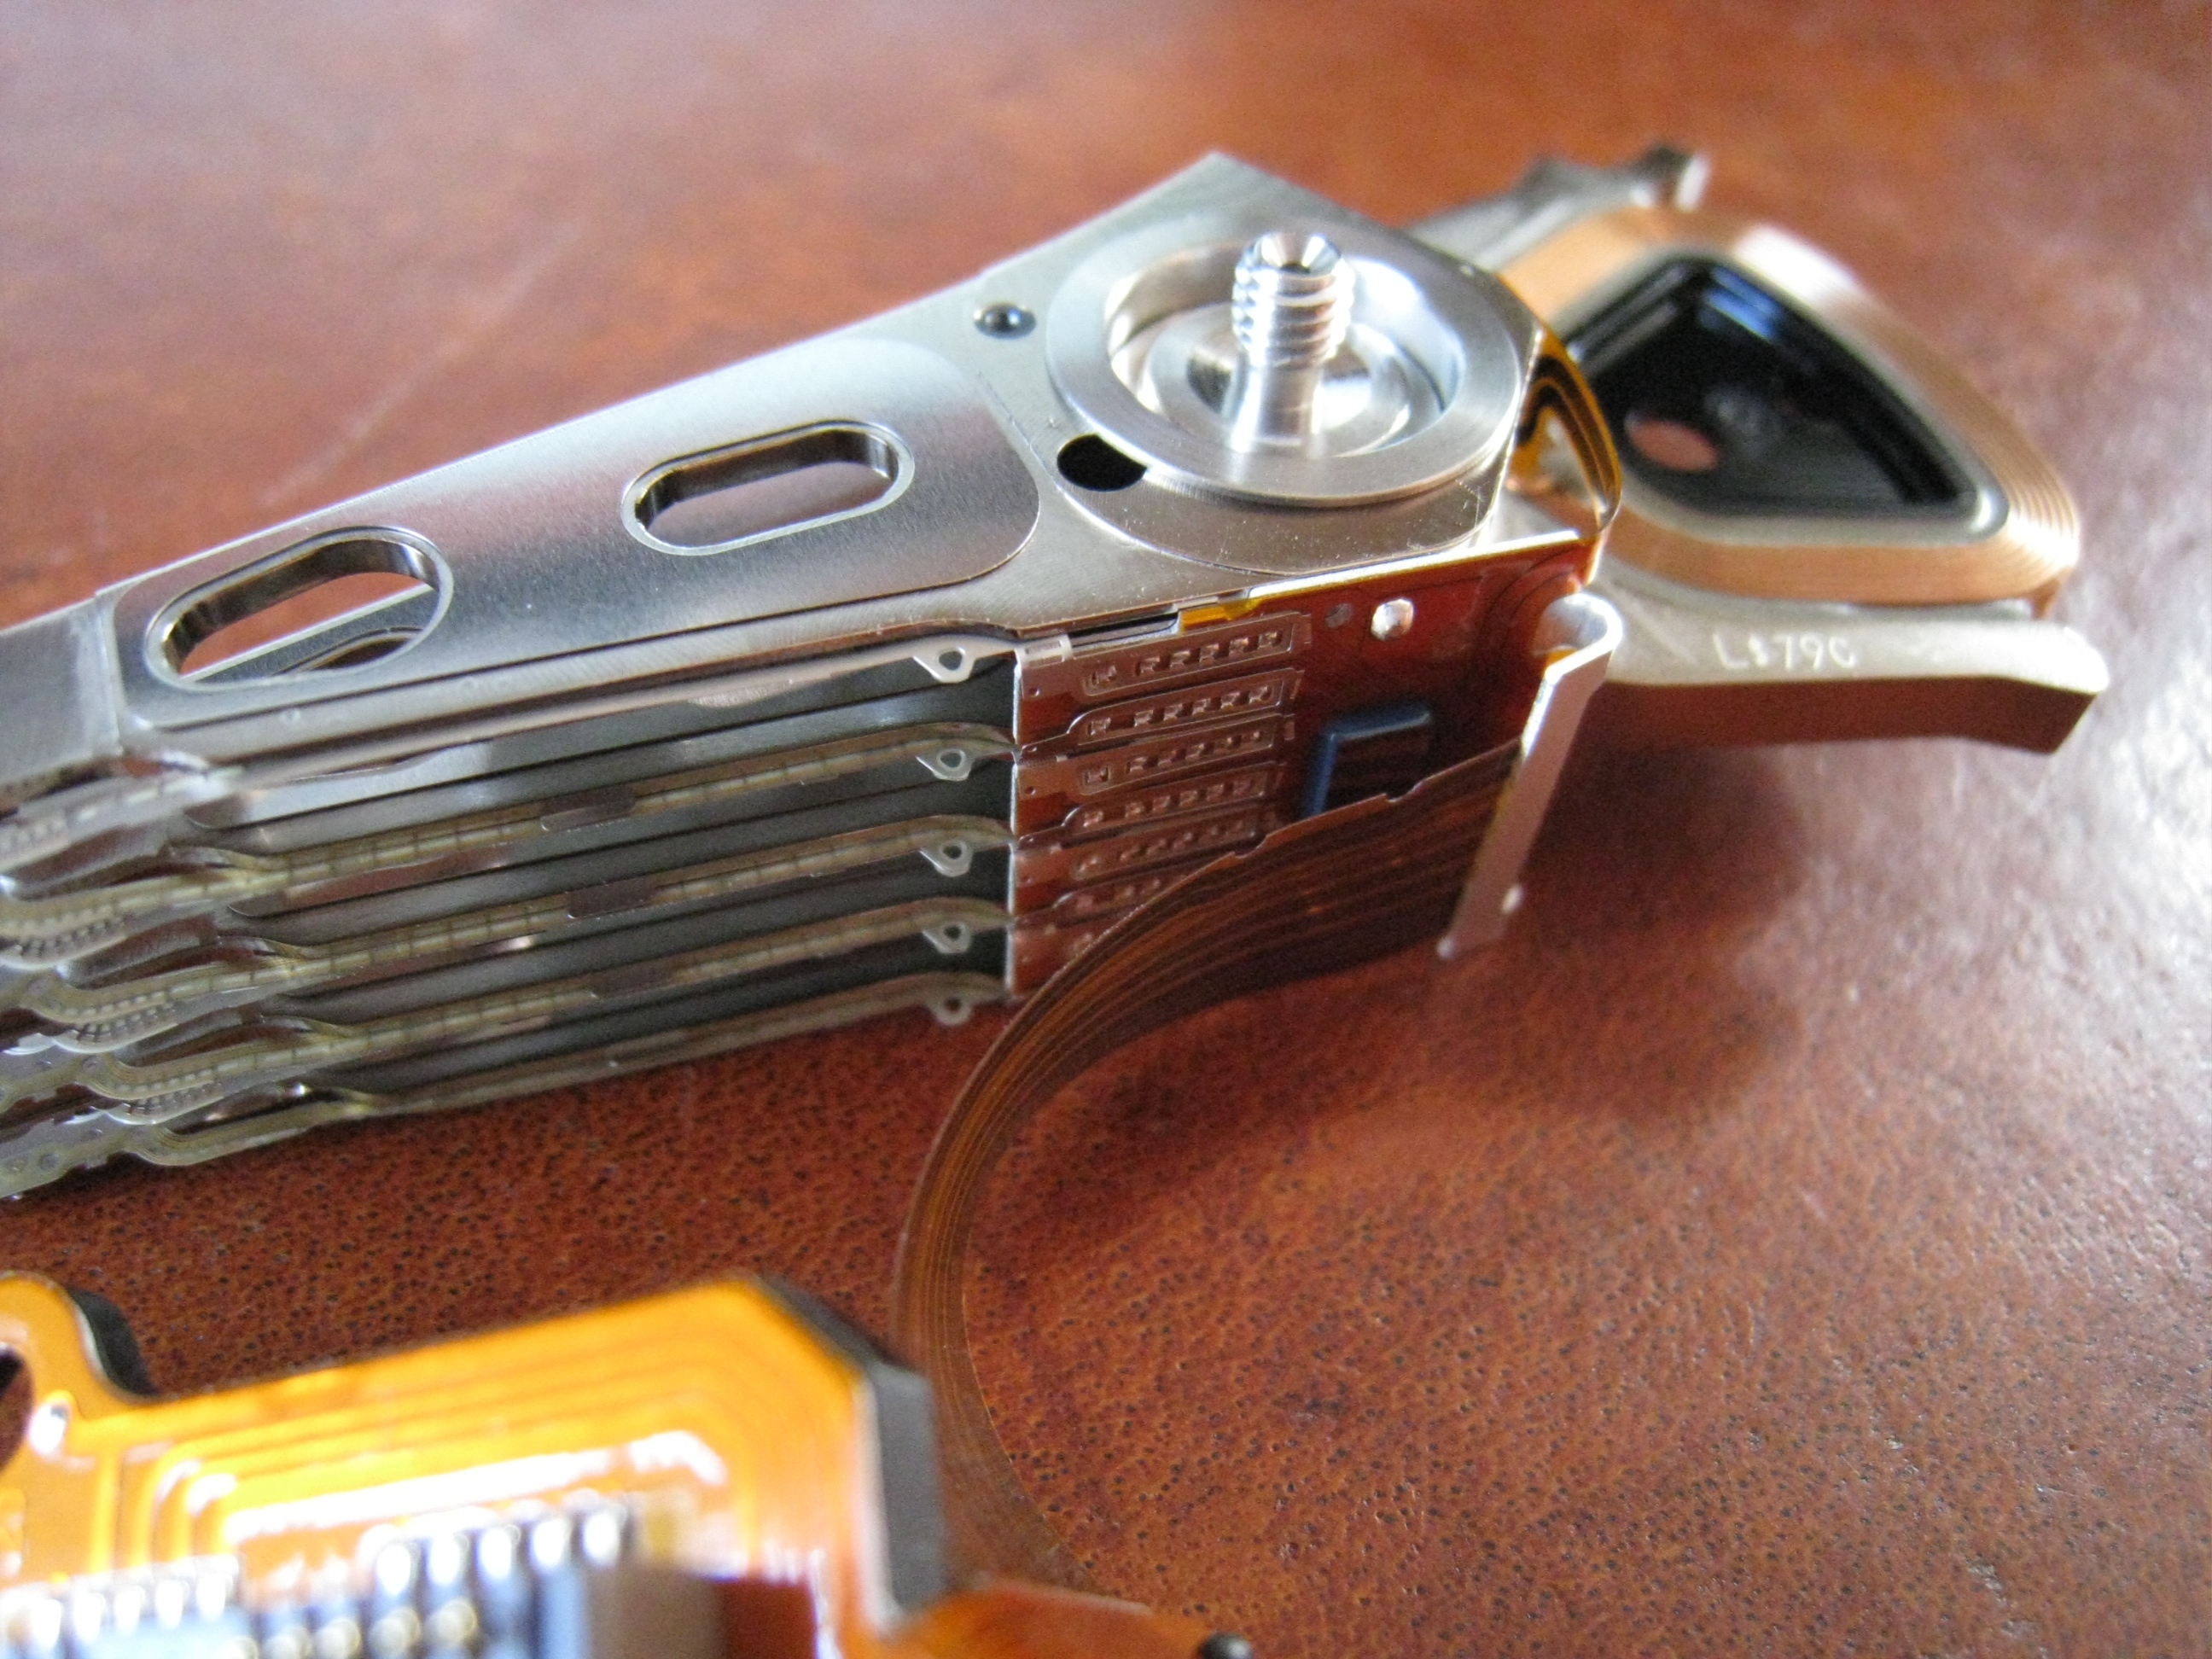
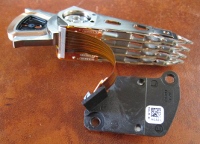 Figure 2. These are the read-write heads on the hard drive. The drive consists of four platters, hence the stack of read-write heads. Figure 2. These are the read-write heads on the hard drive. The drive consists of four platters, hence the stack of read-write heads.
|
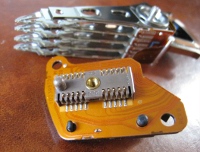 Figure 3. This provides the connections between the read-write heads, which are inside the shell, and the circuit board, which is outside the shell. Figure 3. This provides the connections between the read-write heads, which are inside the shell, and the circuit board, which is outside the shell.
|
 Figure 4. This picture is centered on the amplifiers for the read-write heads. I believe this is the part that actually went bad and caused the read-write heads to go from the parked position, to the very outer edge of the platter, then back to parked position. That, in turn, caused the "click of death", which was when the heads hit the center post holding the platters. Figure 4. This picture is centered on the amplifiers for the read-write heads. I believe this is the part that actually went bad and caused the read-write heads to go from the parked position, to the very outer edge of the platter, then back to parked position. That, in turn, caused the "click of death", which was when the heads hit the center post holding the platters.
|
Gary Schafer, 3 November 2010
The picture says it all. This is the current state of my data. This hard drive has over 16 GB of hard-to-replace data. The hard drive, a 750 GB Seagate SATA drive, died this past Saturday. A couple of calls to two different data recovery companies told me that the minimum I was going to have to pay for recovering my data was $600. I don't have that kind of money. Don't get me wrong. I'm doing okay. But not that okay.
When I started up my computer this past Saturday morning, bowl of cereal in hand, ready to just sit, munch on my cereal, and read the latest news, instead of my computer coming up like normal, I got a loud, clicking sound. The clicks came about once a second. Come to find out, it was the read/write head going from its parked position (which is next to the center axis of the hard drive) to its outermost position. As soon as it got to the outermost position, it went back to the parked position. It slammed into the center axis post, which was the loud "click" I was hearing.
A hard drive is a very complicated piece of equipment. But, in this case, there were only three components. The components are the platters (holding the data), the read/write heads with the combined amplifier, and the drive electronics board, which is on the bottom of the drive. It turns out that swapping these parts is relatively easy, "relative" being the keyword here. However, swapping the parts correctly, well, that's a different story. I figured out that the read/write head, probably the amplifier, was causing problems. I happened to have an identical hard drive sitting in storage. I'd bought this one and the good one simultaneously. So, I was able to start swapping parts. When I replaced the read/write heads, the clicking stopped, but I received all kinds of errors first (with no ability to actually connect to the data part of the hard drive), then nothing when I restarted the drive.
The good news is that I made backups of my data. The bad news is I did that six months ago. So, what did I lose? The biggest personal loss was the latest version of the Freemat Primer, which I've been working on with Tim Cyders over the past year and a half. It's been slow because work, personal obligations, and masters classes have taken up the bulk of my time. And even more so with Tim. And its not that I should know better; its that I do know better. It's not that a hard drive may go bad; its that a hard drive will go bad. I know that, but I didn't take care to back up my crucial data. So now I have to start up where I left off six months ago.
Please, learn from this lesson. Back up your data!
UPDATE (6 Nov 2010): I've added several more pictures of the now-dead read-write heads. Note the brown ribbon cable between the heads and the black piece of plastic holding what appears to be a circuit board. I don't believe it's actually a circuit board, merely the mechanism that provides connections between the read/write heads and the actual circuit board on the bottom of the hard drive.
Here's a Random Fact...
The 9/11 Count: